Introduction: The Critical Need for Fortinet Monitoring

Chaitanya Sistla
May 11, 2025
8 min read
Don’t forget to share!
Try OpenObserve Cloud today for more efficient and performant observability.
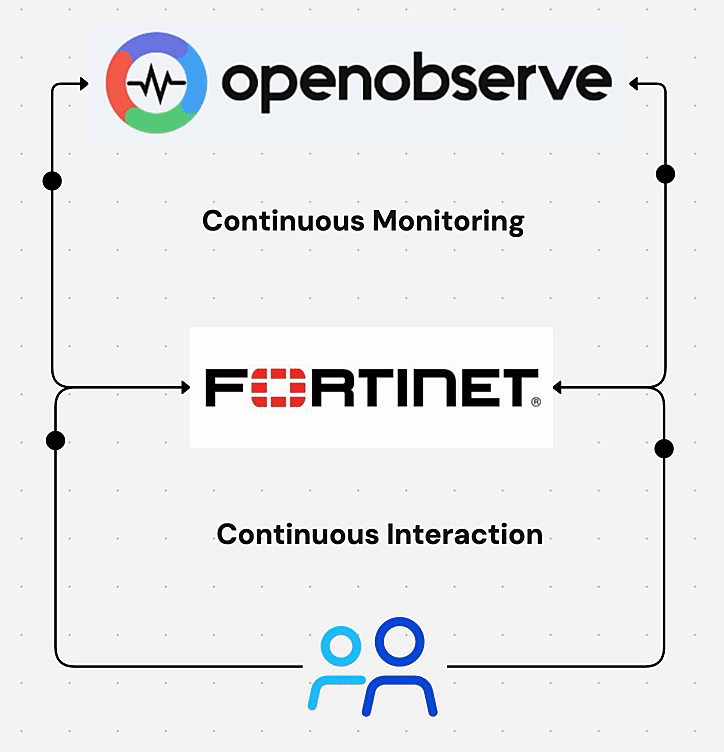
Maintaining visibility into your network security infrastructure is no longer optional, it's imperative. Fortinet firewalls stand at the frontline of your organization's defense, filtering traffic, blocking threats, and safeguarding critical assets. However, without proper monitoring, these powerful security appliances can become blind spots in your security posture.
Fortinet devices generate a wealth of security intelligence through their logs by capturing everything from connection attempts and policy matches to potential intrusions and performance metrics. These logs hold the key to understanding your security posture, identifying emerging threats, and ensuring compliance with security frameworks. When these logs remain unmonitored or underutilized, organizations miss critical security insights that could prevent breaches, data loss, or service disruptions.
Effective Fortinet monitoring brings multiple benefits:
OpenObserve provides a comprehensive solution to unlock these benefits, transforming raw Fortinet logs into actionable security intelligence. This platform's cloud-native architecture offers scalable ingestion, processing, and visualization capabilities—handling everything from small deployments to enterprise-scale Fortinet implementations generating terabytes of daily log data.
This guide walks you through the complete process of implementing a Fortinet monitoring system using OpenObserve, from configuring log collection to building insightful dashboards. By following these steps, you'll establish continuous visibility into your Fortinet infrastructure, enabling proactive security monitoring and rapid response to potential threats.
Before starting, ensure you have:
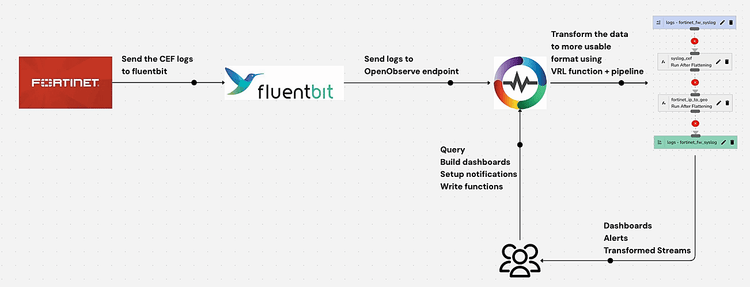
Fluent Bit serves as an efficient log processor that will collect logs from your Fortinet devices and forward them to OpenObserve.
First, install Fluent Bit on your designated server:
# For Debian/Ubuntu
curl https://raw.githubusercontent.com/fluent/fluent-bit/master/install.sh | sh

# For RHEL/CentOS
curl https://raw.githubusercontent.com/fluent/fluent-bit/master/install.sh | sh
Create the main configuration file at /etc/fluent-bit/fluent-bit.conf:
[SERVICE]
    Flush        5
    Daemon       Off
    Log_Level    debug
    Parsers_File parsers.conf

[INPUT]
    Name        syslog
    Listen      0.0.0.0
    Port        514
    Mode        udp
    Parser      fortinet-cef
    Tag         fortinet

[OUTPUT]
    Name http
    Match fortinet
    URI /api/default/fortinet_fw_syslog/_json
    Host <your-openobserve-instance>
    Port 443
    tls On
    Format json
    Json_date_key    _timestamp
    Json_date_format iso8601
    HTTP_User <your-username>
    HTTP_Passwd <your-password>
    compress gzip
Create a custom parser configuration at /etc/fluent-bit/parsers.conf:
[PARSER]
    Name        fortinet-cef
    Format      regex
    Regex       ^\<(?<pri>[0-9]+)\>(?<time>[^ ]+ [^ ]+ [^ ]+) (?<host>[^ ]+) (?<message>.+)$
    Time_Key    time
    Time_Format %b %d %H:%M:%S
    Time_Keep   On
sudo systemctl enable fluent-bit
sudo systemctl start fluent-bit
Verify it's running properly:
sudo systemctl status fluent-bit
Now that our syslog server is ready, we need to configure the Fortinet firewall to send logs to it.
For more detailed instructions, refer to the official Fortinet documentation.
Once logs are flowing into OpenObserve, we need to transform them into a more usable format for analysis. We'll use VRL (Vector Remap Language) functions for this purpose.
In the OpenObserve UI, navigate to Settings > Functions and create the following VRL functions:
syslog_cef:. = merge(., {"cef": parse_cef!(.message)})
.
fortinet_ip_to_geo:# Ensure 'publicip' exists and is a valid IP address (IPv4 or IPv6)
if exists(.cef_dst) && (is_ipv4(string!(.cef_dst)) || is_ipv6(string!(.cef_dst))) {
# Perform GeoIP enrichment using the MaxMind City database
.geo_city_data = get_enrichment_table_record!("maxmind_city", {"ip": string!(.cef_dst)})
# Extract specific fields from the city data if enrichment is successful
if exists(.geo_city_data) {
.geo_city = .geo_city_data.city
.geo_country = .geo_city_data.country
.geo_latitude = .geo_city_data.latitude
.geo_longitude = .geo_city_data.longitude
# Optionally delete the raw geo_city_data field to clean up
del(.geo_city_data)
}
# Perform GeoIP enrichment using the MaxMind ASN database
.geo_asn_data = get_enrichment_table_record!("maxmind_asn", {"ip": string!(.cef_dst)})
# Extract specific fields from the ASN data if enrichment is successful
if exists(.geo_asn_data) {
.geo_asn = .geo_asn_data.asn
.geo_org = .geo_asn_data.organization
}
}
.
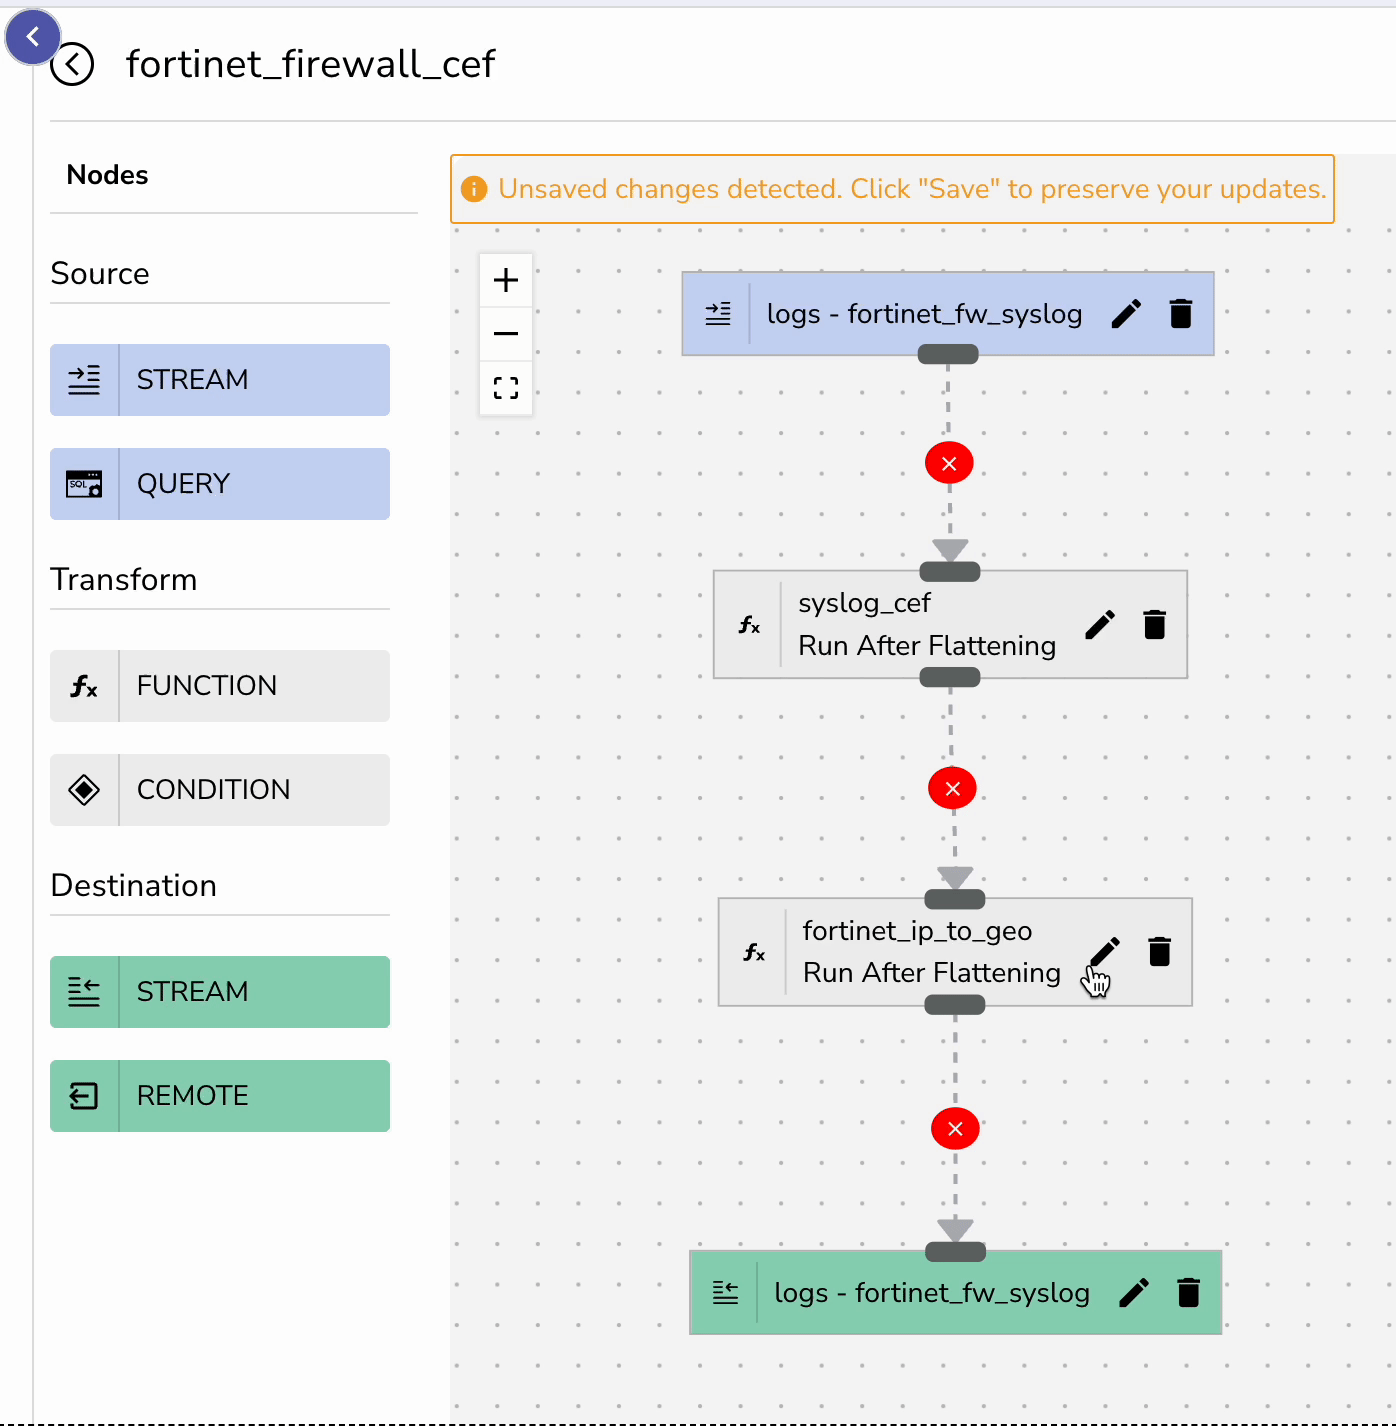 Next, create a pipeline that applies these functions to your incoming Fortinet logs:
fortinet_fw_syslog streamsyslog_cef function as the first stagefortinet_ip_to_geo function as the second stageNote for OpenObserve v14.6.8+ Users: If you're running OpenObserve version 14.6.8 or higher, you can simply upload the pipeline configuration file directly through the UI instead of manually creating the pipeline. Navigate to Pipelines > Import and upload your JSON pipeline fortinet_firewall_cef.json file to instantly configure your data transformation workflow.
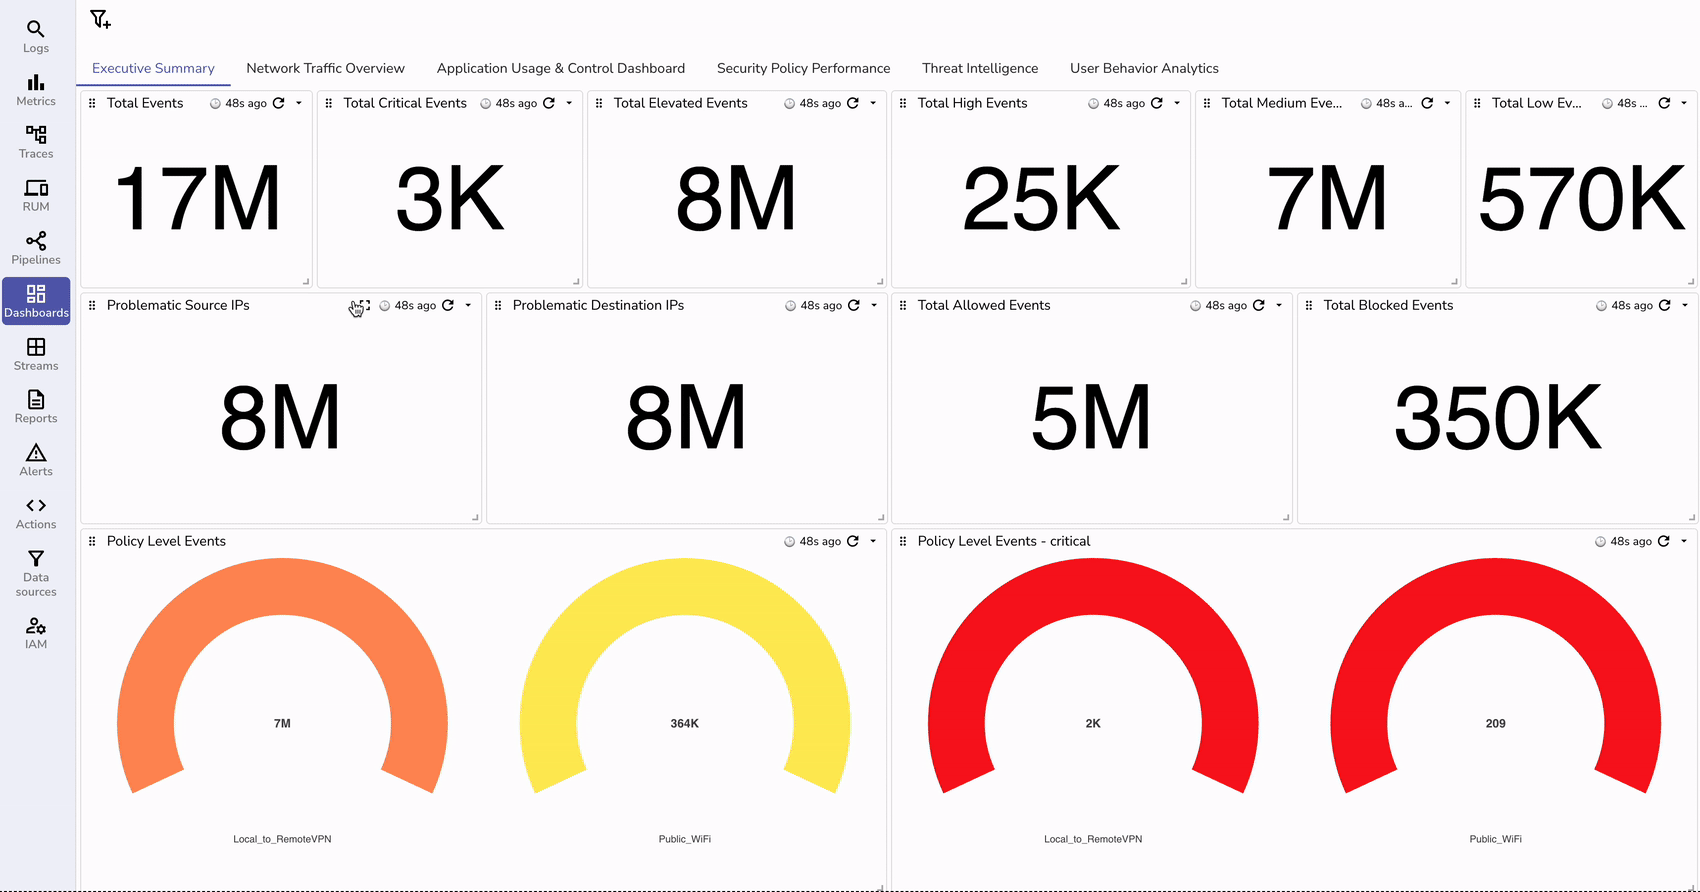
With logs flowing in and properly transformed, you can now create insightful dashboards in OpenObserve.
You can import a pre-configured dashboard by uploading a JSON template Fortinet.dashboard.json through the Import option.
Make sure to replace the stream name from fortinet_fw_syslog to your custom name that you might have configured.
To proactively monitor your Fortinet firewalls, set up alerts in OpenObserve:
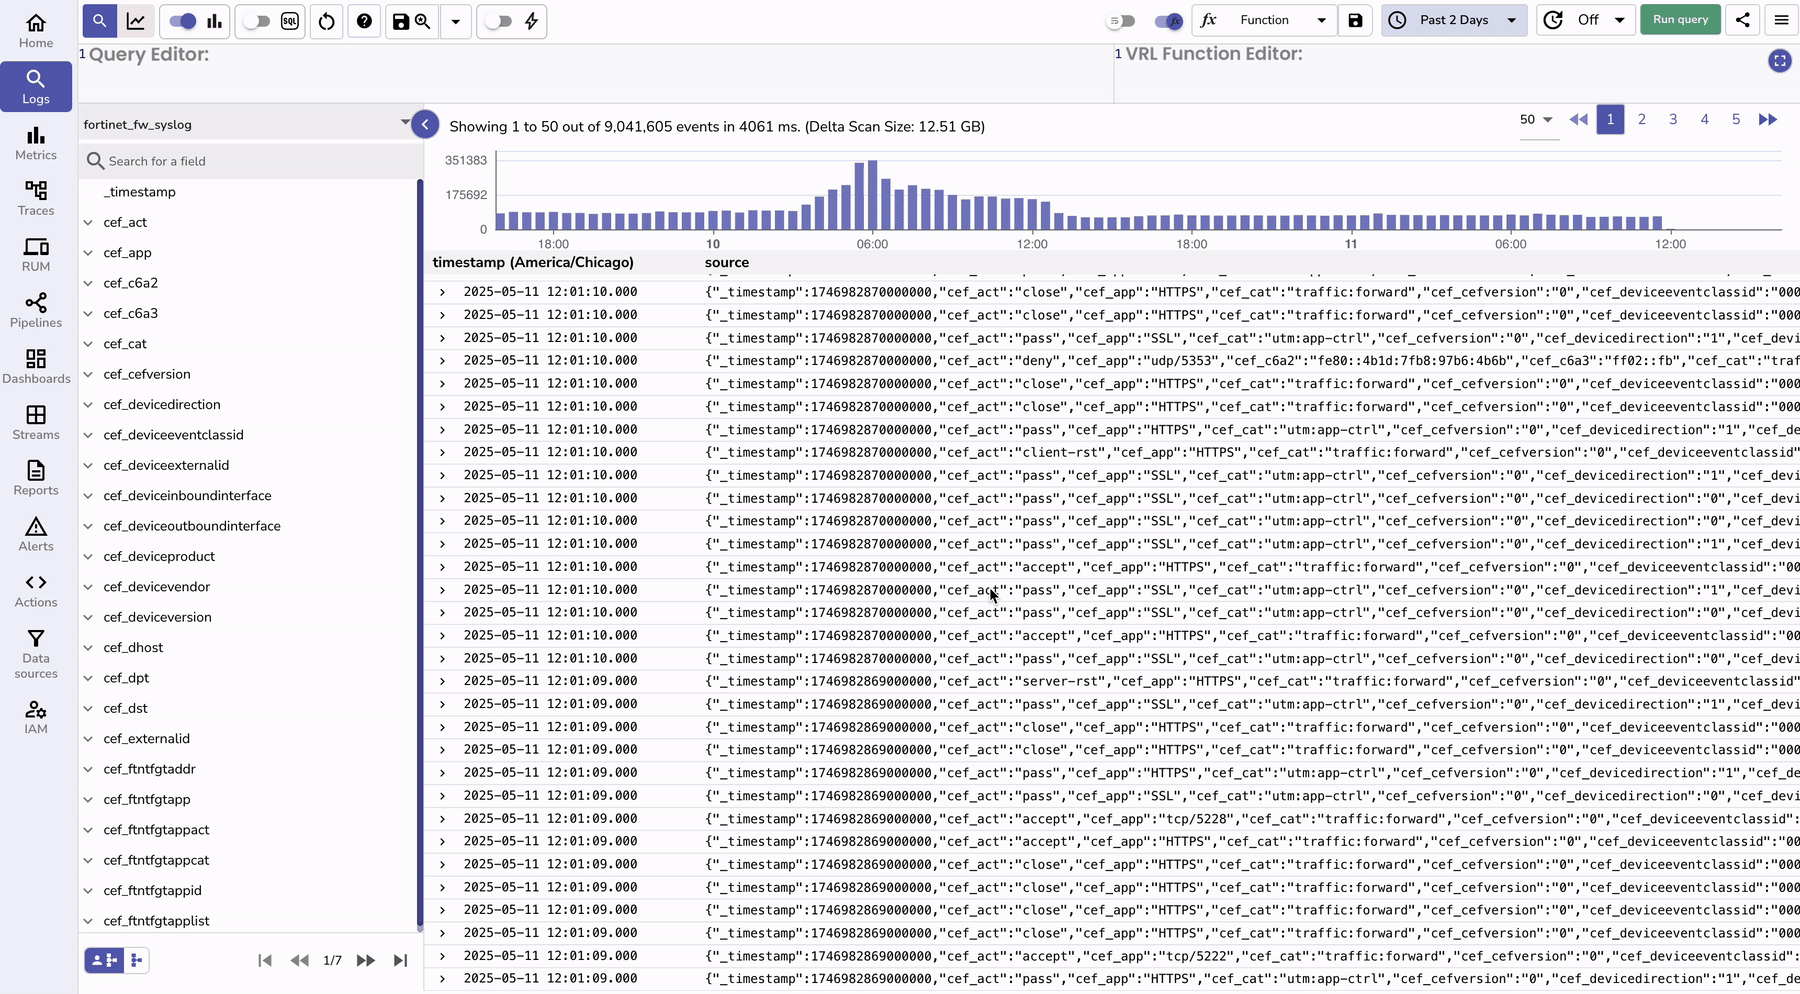
To monitor the logs, you can go to the logs console and search for your stream that has fortinet logs.
| Feature | Without OpenObserve | With OpenObserve |
|---|---|---|
| Log Collection | Manual export or basic syslog | Automated, real-time collection via Fluent Bit |
| Storage | Limited local storage or third-party tools | Scalable, object storage |
| Data Processing | Limited or requires custom scripts | Advanced processing with VRL functions |
| Geo-enrichment | Not available or requires additional tools | Built-in geo-enrichment capabilities |
| Visualization | Basic or requires additional software | Customizable, real-time dashboards |
| Search Capability | Limited text search | Full-text search with complex queries |
| Alerting | Basic or none | Advanced alerting with multiple conditions |
| Historical Analysis | Limited by storage | Extended retention with efficient compression |
| Cost | Often requires multiple paid tools | Single platform, often more cost-effective |
| Setup Complexity | Multiple systems to integrate | Unified platform with streamlined setup |
| Performance Impact | Can be resource-intensive | Optimized for high-performance log processing |
 Monitoring Fortinet firewalls with OpenObserve provides a comprehensive solution for security observability. By following this guide, you've set up a complete monitoring system that collects logs from your Fortinet devices, processes them for better insights, and visualizes the data in intuitive dashboards.
This approach not only enhances your security posture but also simplifies the monitoring process, allowing you to focus on addressing security concerns rather than managing log infrastructure. The real-time nature of the system ensures you stay ahead of potential threats, while the historical data enables trend analysis and security posture improvement over time.
With this setup, you'll be well-equipped to monitor, analyze, and respond to security events across your Fortinet infrastructure, turning raw log data into actionable security intelligence.
Get Started with OpenObserve Today!
Sign up for a 14 day trial. Check out our GitHub repository for self-hosting and contribution opportunities.
Chaitanya Sistla is a Principal Solutions Architect with 17X certifications across Cloud, Data, DevOps, and Cybersecurity. Leveraging extensive startup experience and a focus on MLOps, Chaitanya excels at designing scalable, innovative solutions that drive operational excellence and business transformation.