Payment Monitoring with Stripe in OpenObserve

Simran Kumari
December 04, 2025
9 min read
Don’t forget to share!
Try OpenObserve Cloud today for more efficient and performant observability.
Stripe is at the heart of many modern SaaS and consumer apps. Whether you're processing subscription payments, one-time charges, or marketplace payouts, you rely on Stripe events to understand what’s happening across your payment pipeline.
But here's the challenge: Stripe only shows you high-level dashboards, but developers, SREs, and finance teams need raw events, analytics, retention, and real-time alerting.
That’s where OpenObserve becomes your observability layer for Stripe.
This article explains how a real production system sends Stripe events into OpenObserve and how you can build dashboards & alerts on top of them.
In this guide, you'll learn:
When most teams integrate Stripe, the dashboard feels like it covers everything. It’s clean, fast, and gives you a neat snapshot of payments and customer activity. But once real users start flowing in, you quickly discover its limits.
Stripe tells you what happened: a payment succeeded, failed, or got disputed , but rarely why it happened. If your checkout API slows down or your backend throws an error, Stripe only shows the final outcome, not the chain of events behind it. It won’t alert you when failures quietly rise, and it can’t help you connect a sudden dispute spike to a code deploy you made half an hour earlier.
Stripe is an exceptional payment platform, but it was never meant to be a monitoring tool. As your system scales, that gap becomes impossible to ignore.
Whenever something happens : payment succeeds, fails, creates a subscription, refunds, disputes , Stripe sends a webhook event to an endpoint you configure.
That JSON event looks like this (simplified):
{
  "id": "evt_123",
  "type": "payment_intent.succeeded",
  "data": {
    "object": {
      "id": "pi_456",
      "amount": 4999,
      "currency": "usd",
      "customer": "cus_123"
    }
  }
}
Key Fields:
id: Unique event identifiertype: Event category (e.g., payment_intent.succeeded, charge.failed)data.object: The actual resource that triggered the eventcreated: Unix timestamp of when the event occurredNow that you understand why monitoring Stripe alongside your backend is so valuable, the next step is: how do you actually get the data into OpenObserve?
Before anything else, there are a few prerequisites.
Once these are in place, you can bring Stripe events into OpenObserve.
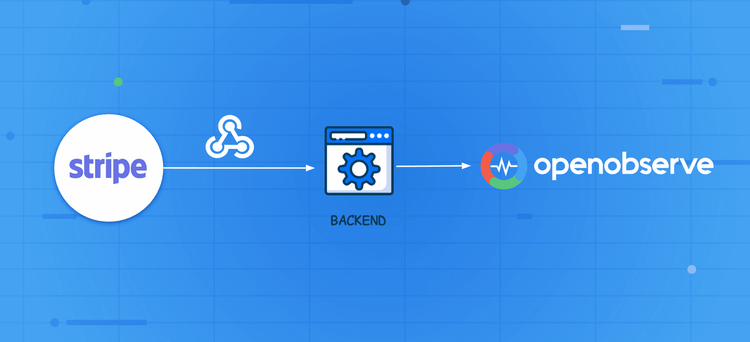
For most production setups, teams must route events through their own backend. This is the only way to ensure security and reliability. Here, Stripe sends the webhook to your server, where you perform three critical actions:
The flow looks like this:

First, you need a server endpoint that can receive Stripe webhook events. For example, you could create: POST /stripe/webhook
You need to secure your endpoint. Refer to the documentation.
CRITICAL SECURITY STEP: Your server must verify the Stripe-Signature header using your webhook secret. If verification fails, reject the request (e.g., 400 response). Never process an unverified Stripe webhook in production.
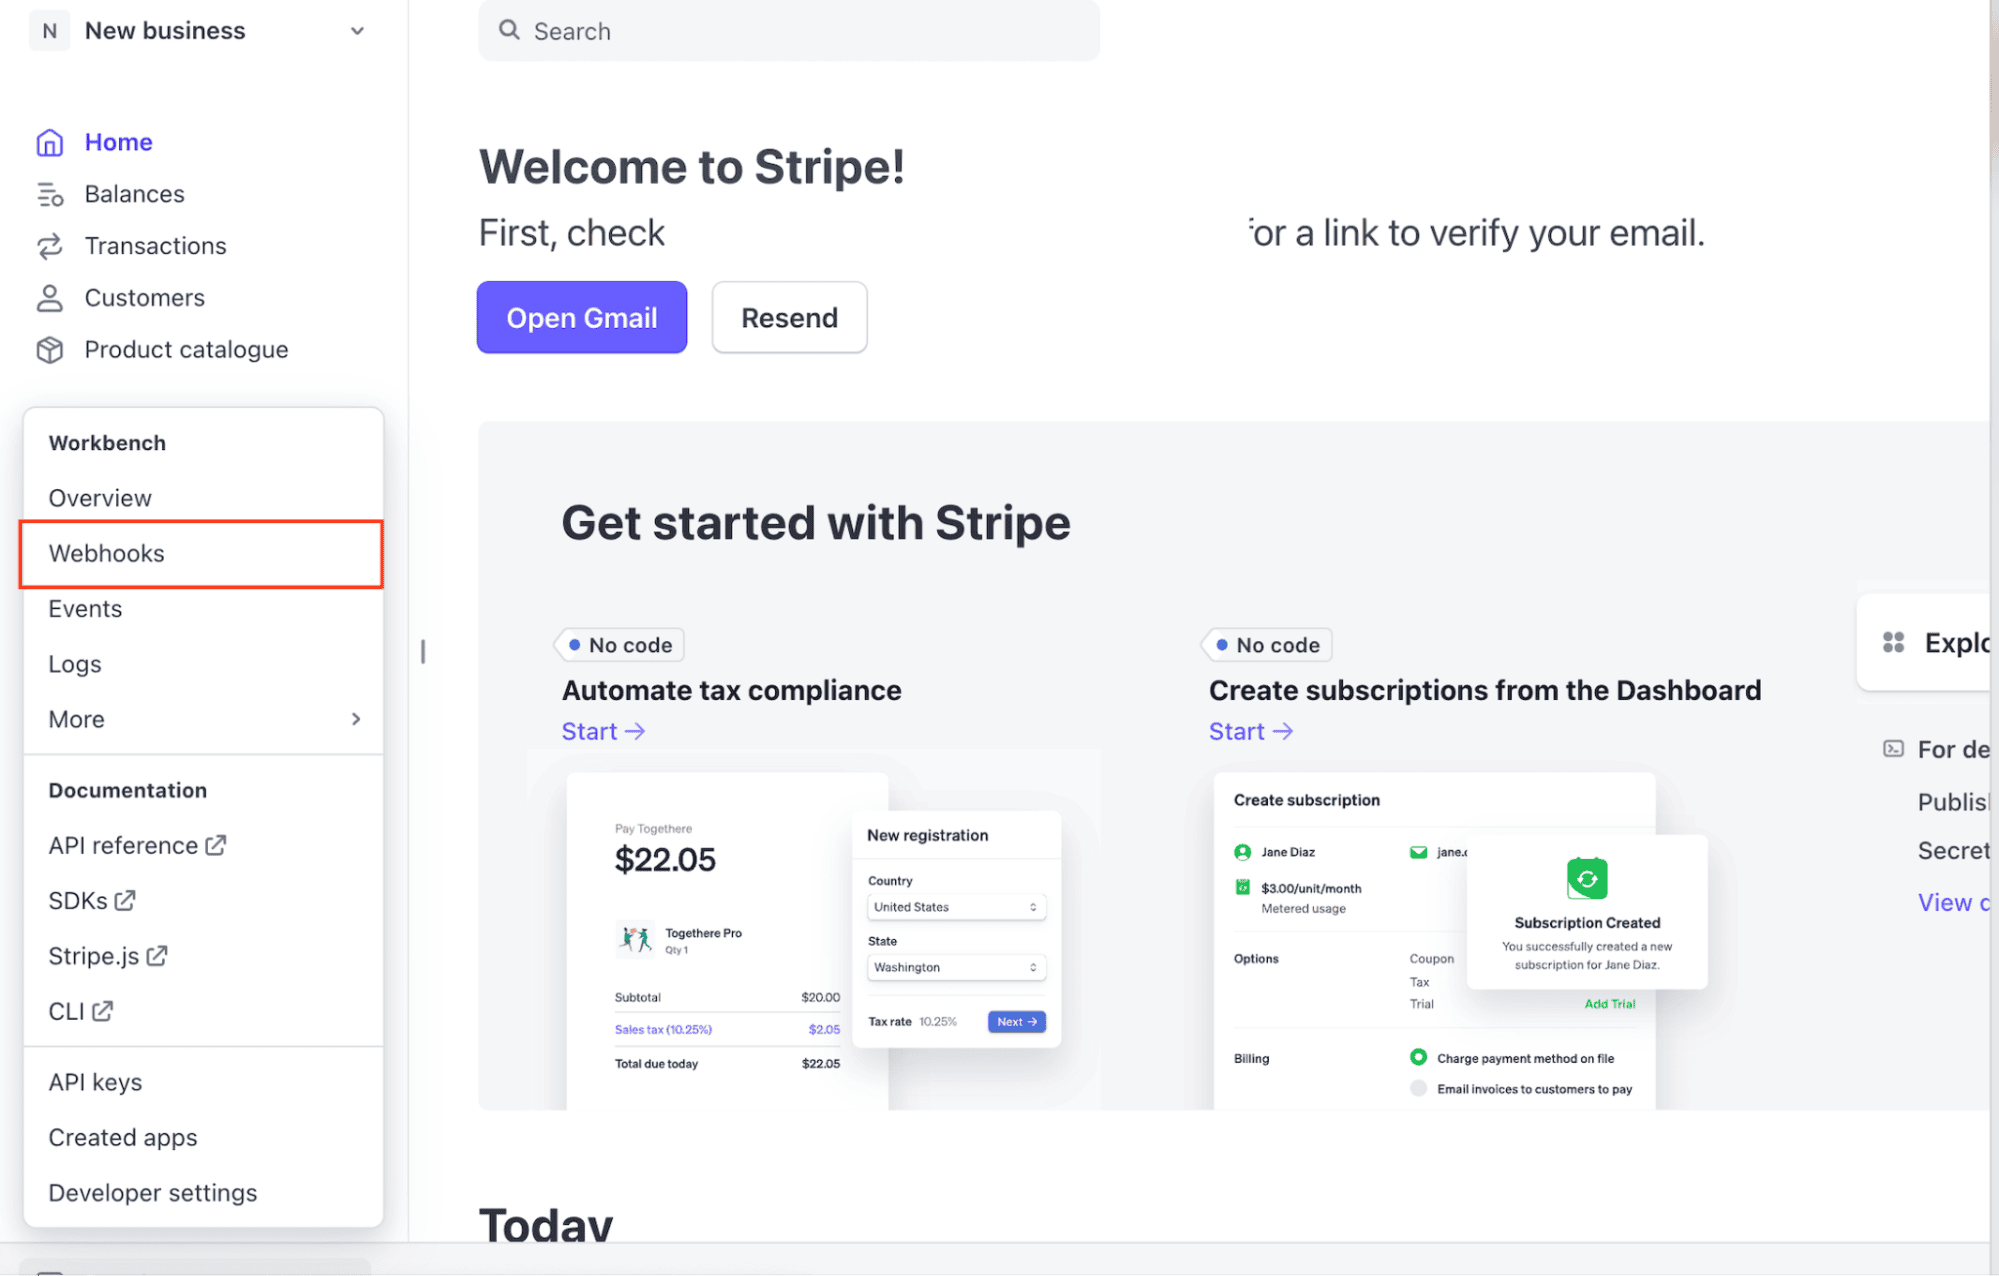
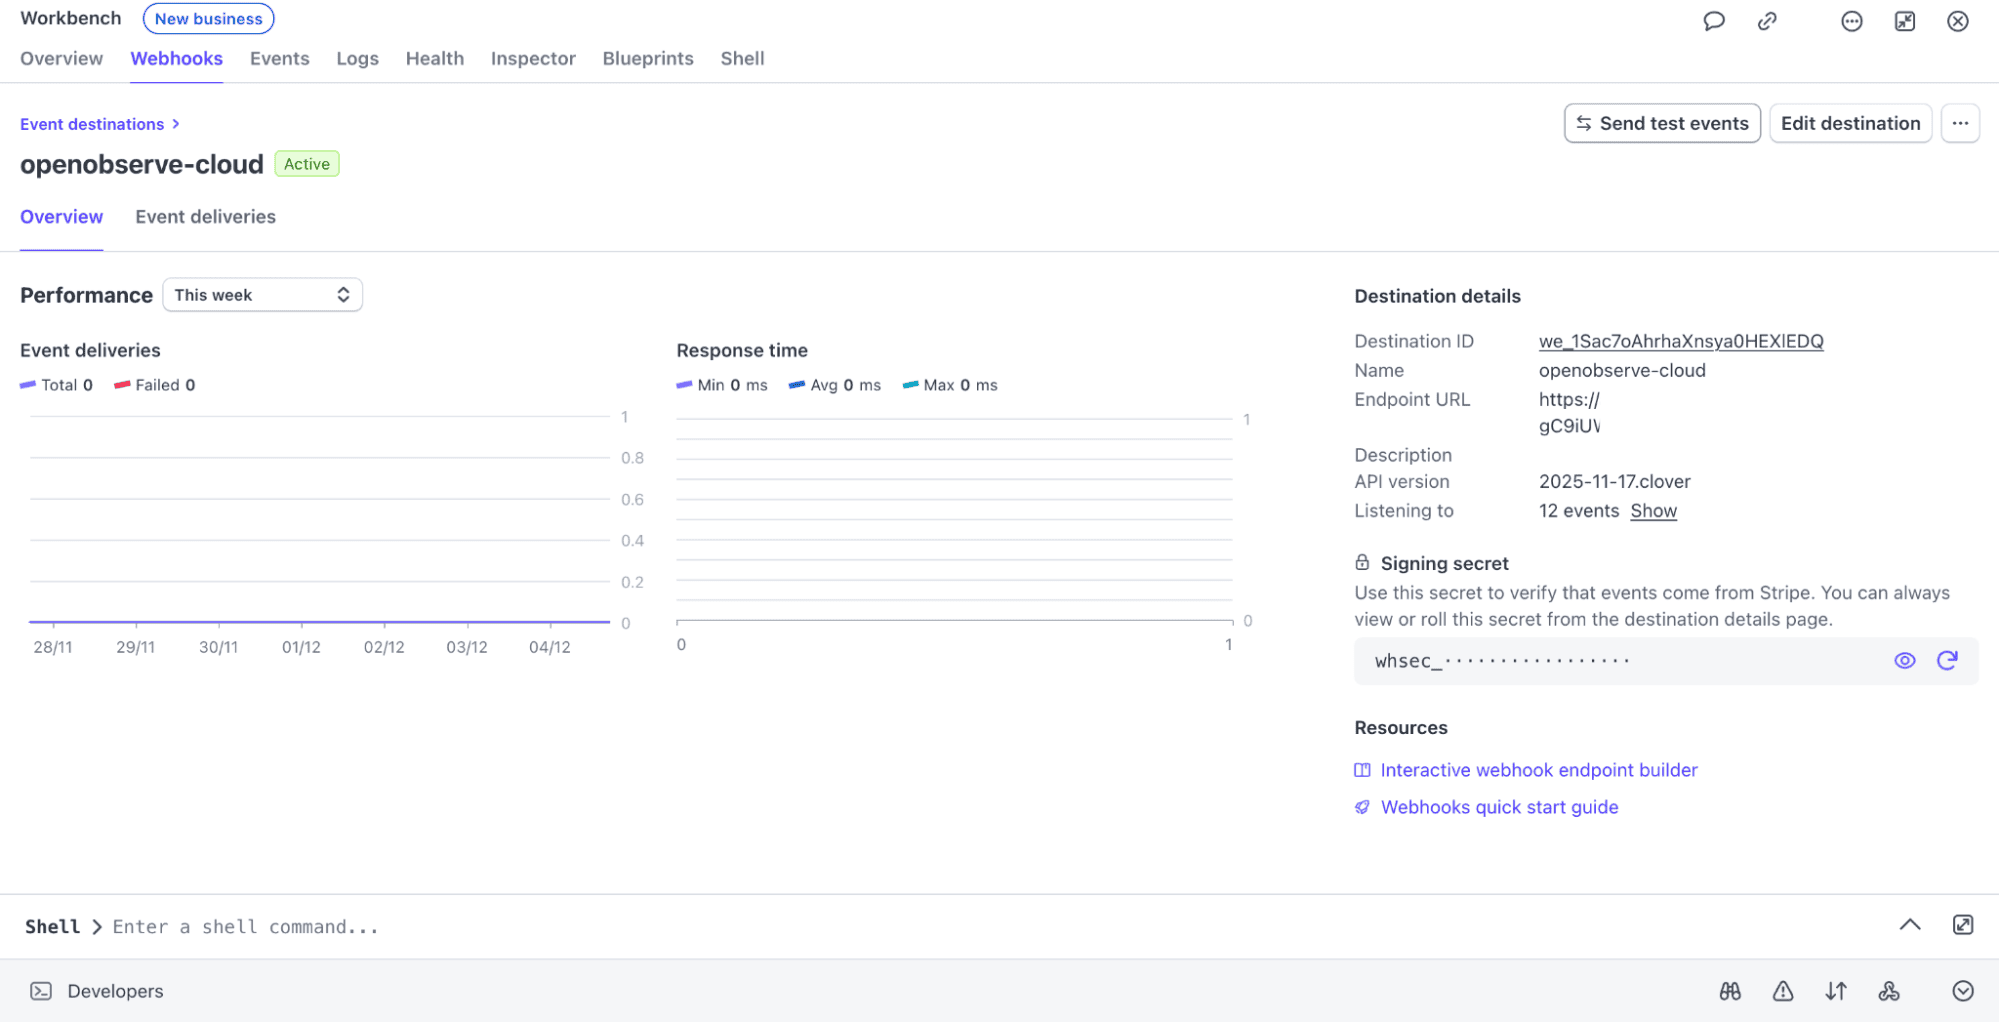
In your Stripe dashboard:
https://yourapp.com/stripe/webhook)
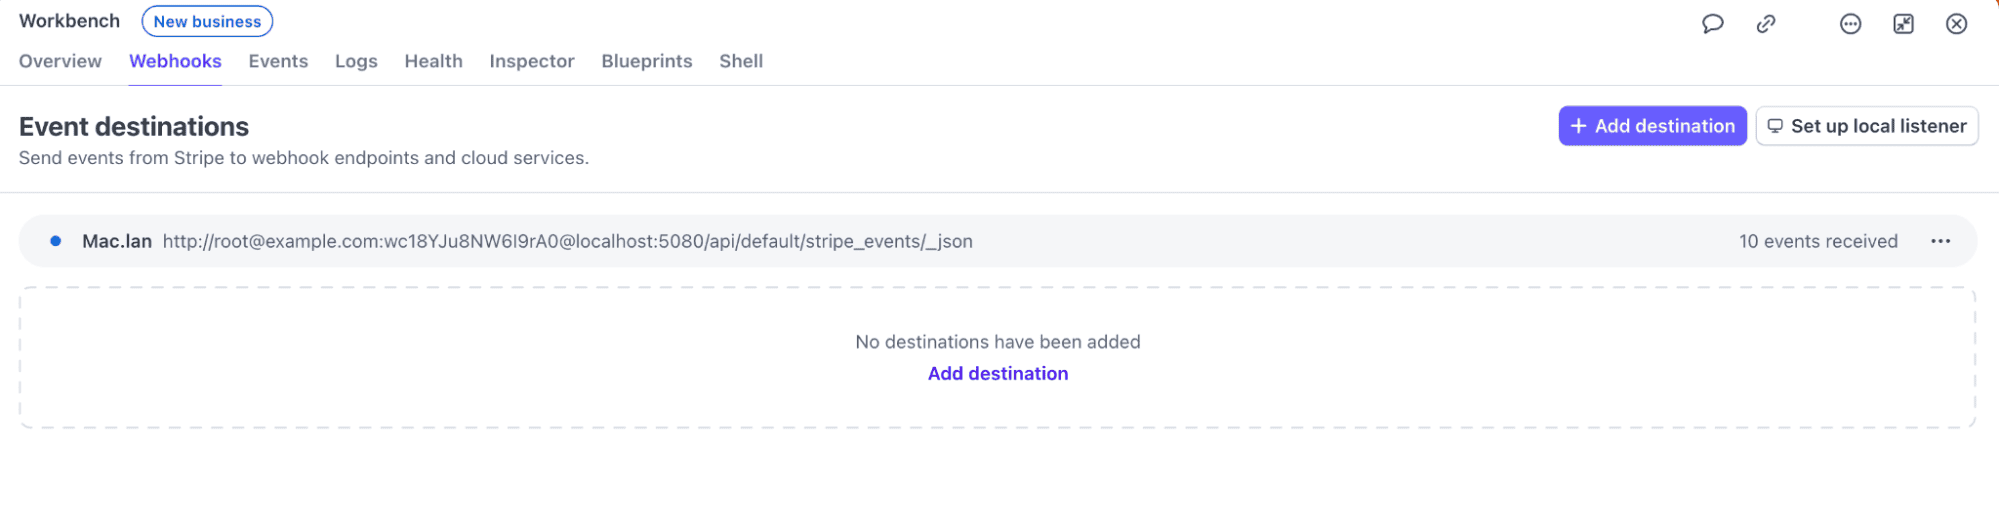
payment_intent.succeeded, charge.failed, invoice.payment_failed)
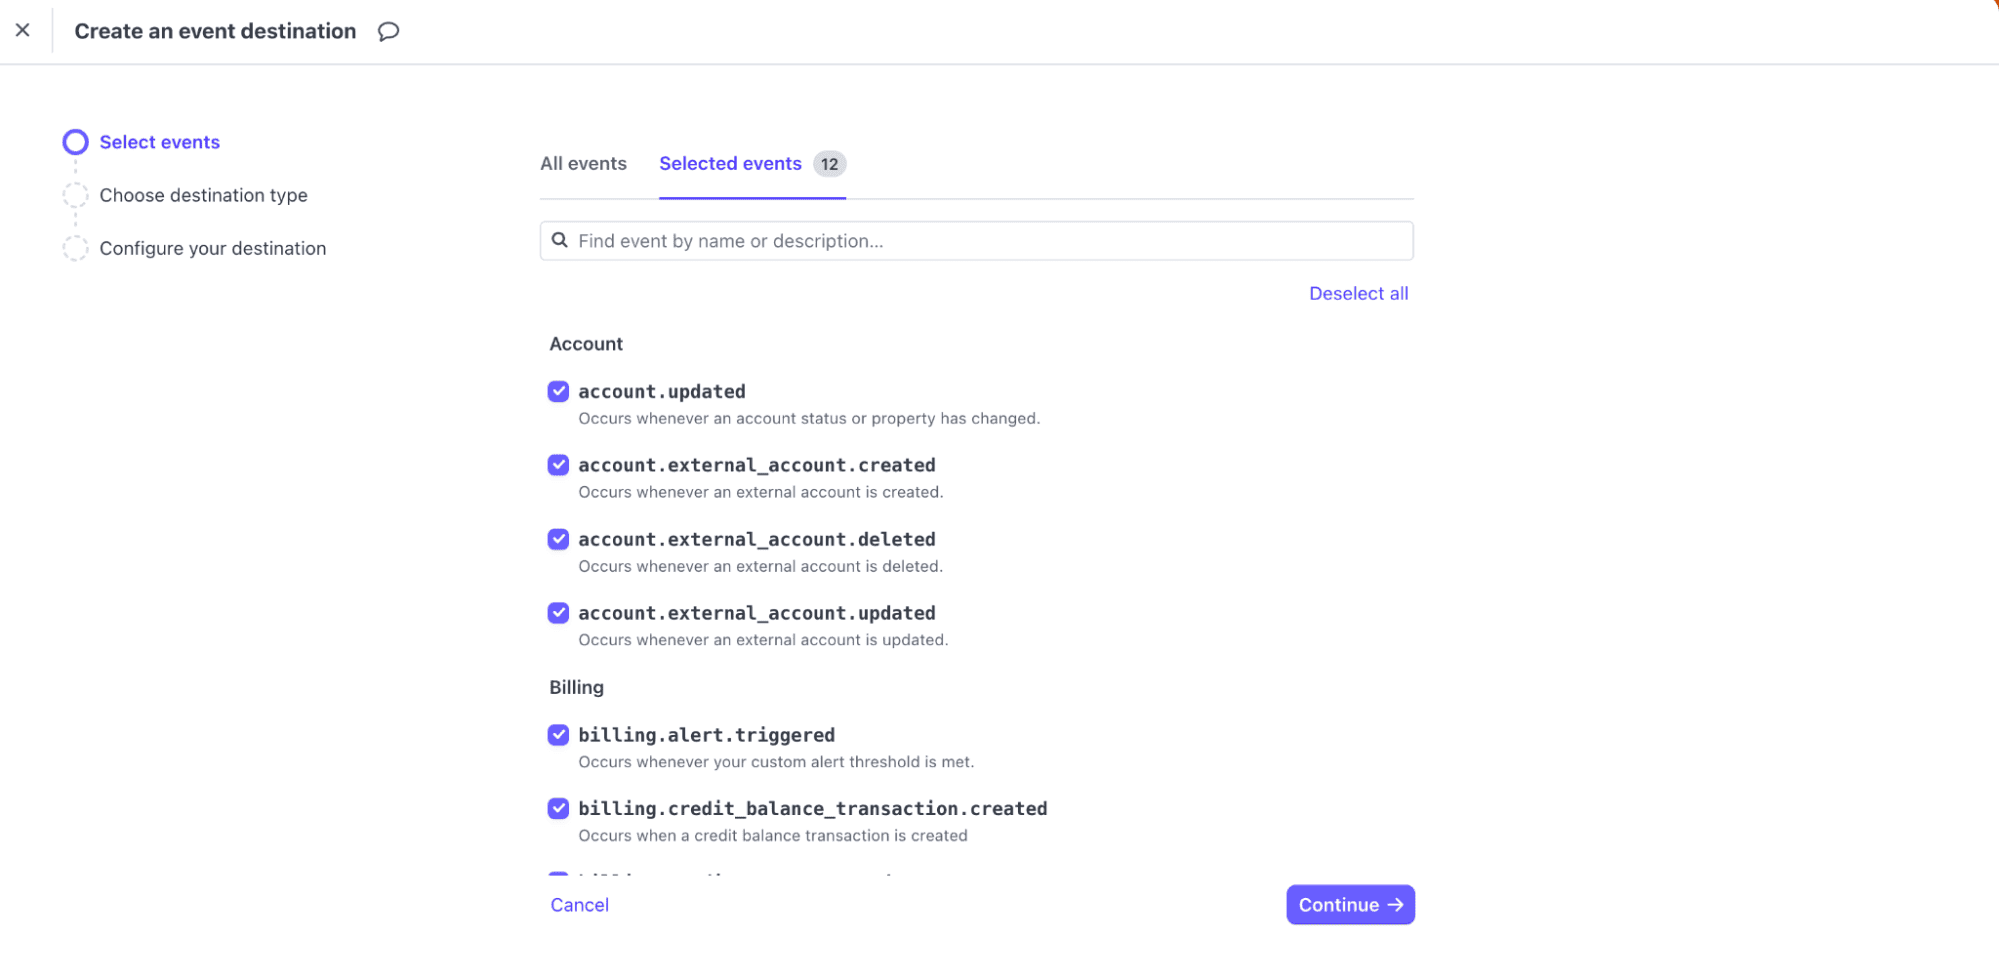

 Stripe will deliver all matching events to your backend.
Stripe requires an immediate 200 response (typically within 3 seconds) to prevent retries. You must perform signature verification and then return the response quickly. The task of forwarding to OpenObserve must be delegated.
A reliable production flow is:
Once the event is in the queue, a separate worker process will handle Step 4.
Your dedicated worker process retrieves the event from the queue and sends it to OpenObserve using the ingestion API.
Here’s an example of the ingestion logic, which runs safely outside the critical webhook response path:
const axios = require('axios');

async function forwardToOpenObserve(event) {
  // This code runs in an asynchronous worker/queue processor, NOT the
  // main webhook handler, ensuring the response to Stripe is fast.
  try {
    await axios.post(
      'https://api.openobserve.ai/api/<org>/<stream>/_json',
      [event],  // payload must be an array of JSON objects
      {
        auth: {
          username: 'YOUR_USERNAME',
          password: 'YOUR_API_KEY'
        }
      }
    );
    console.log(`Successfully forwarded event ${event.id} to OpenObserve.`);
  } catch (error) {
    console.error(`Failed to forward event to OpenObserve:`, error.message);
    // Implement retry logic here if needed.
  }
}
You can call forwardToOpenObserve(event) from your worker process for every verified webhook.
Developers often enrich the Stripe event with internal data points before sending it to OpenObserve. For example, adding:
Before going live, you want to make sure your ingestion and dashboards work as expected. This is where Stripe CLI becomes invaluable. It simulates real Stripe events without requiring actual payments or real customers.
You can:
payment_intent.succeeded or charge.failed eventsThis lets you verify that OpenObserve receives the events, that your backend forwarding works correctly, and that dashboards or alerts react as expected all in a safe sandbox environment.
Steps:
brew install stripe/stripe-cli/stripe
stripe --version
stripe login
stripe trigger payment_intent.succeeded
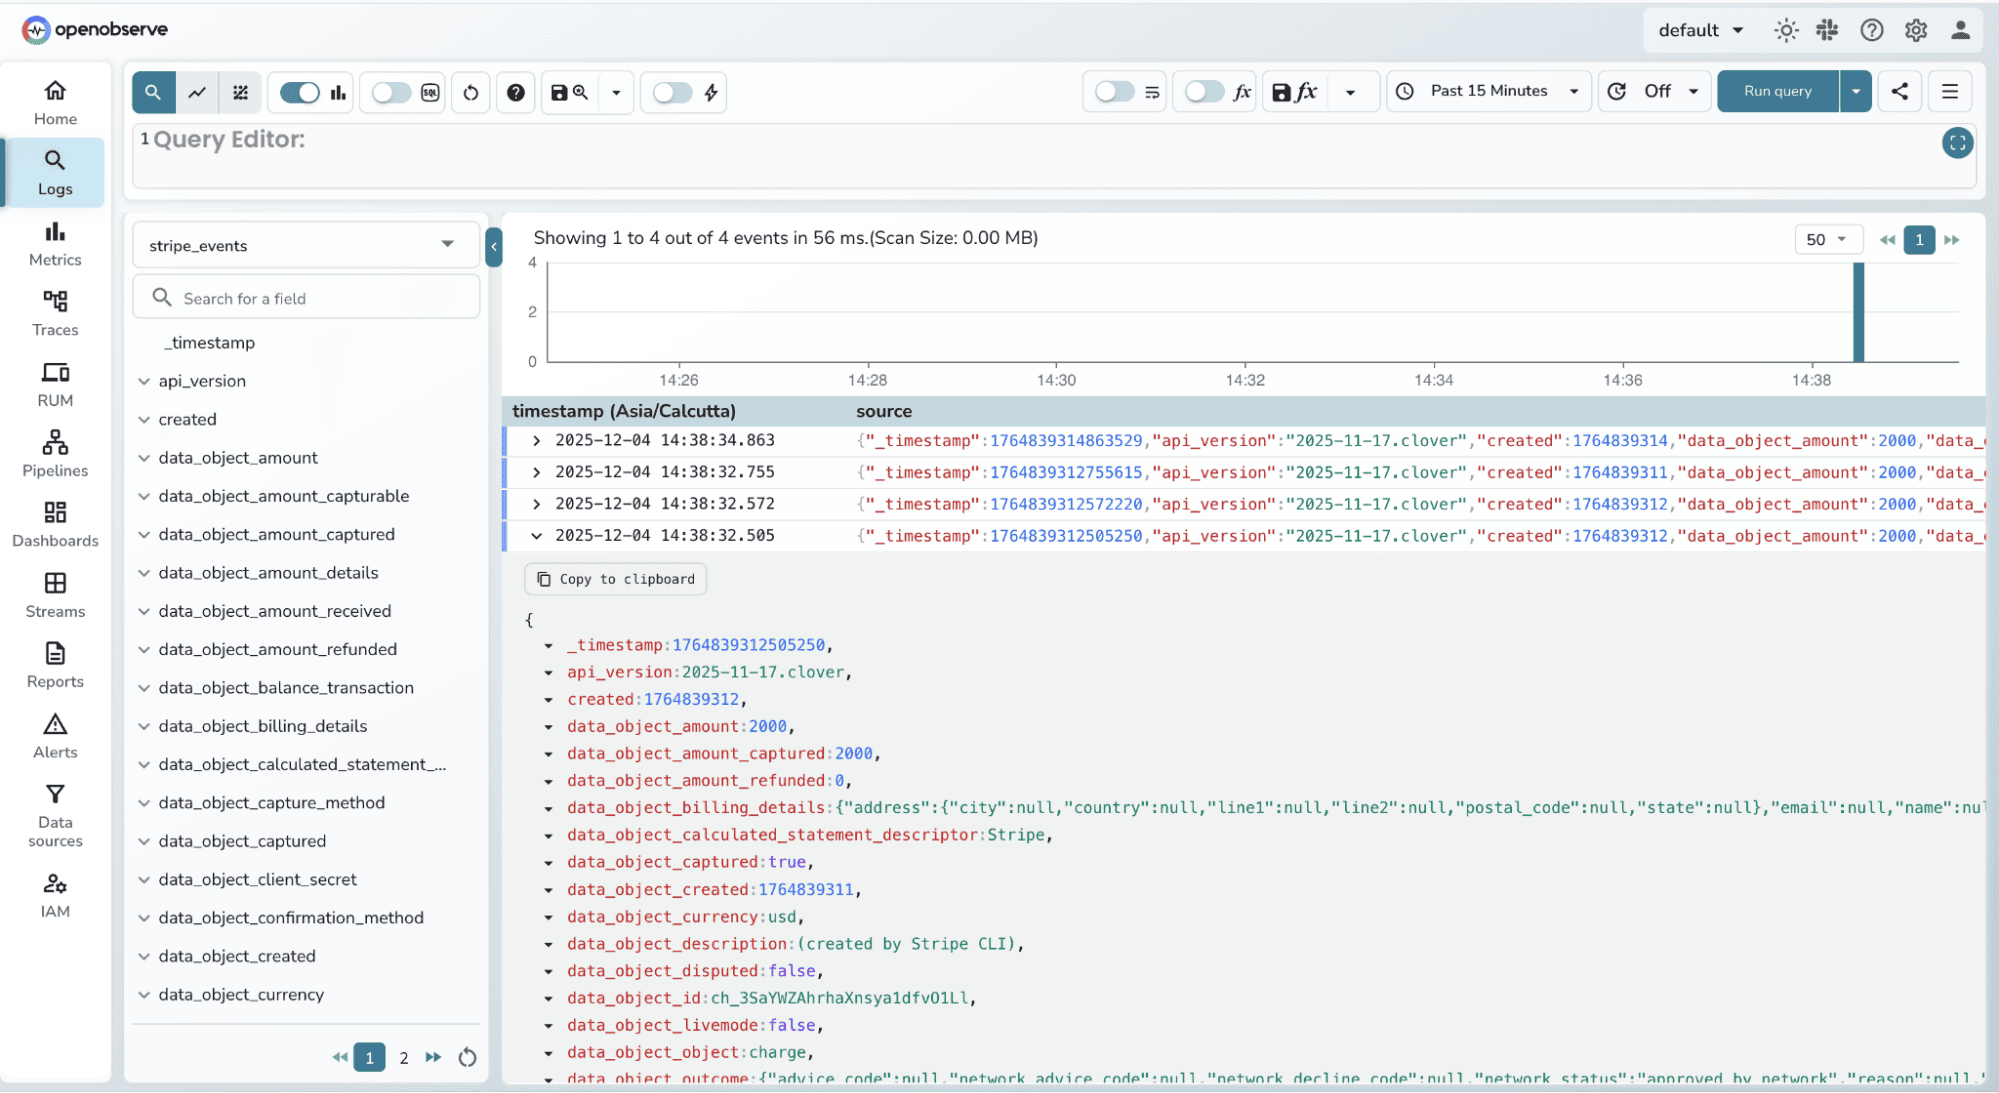
The events will be POSTed to OpenObserve.

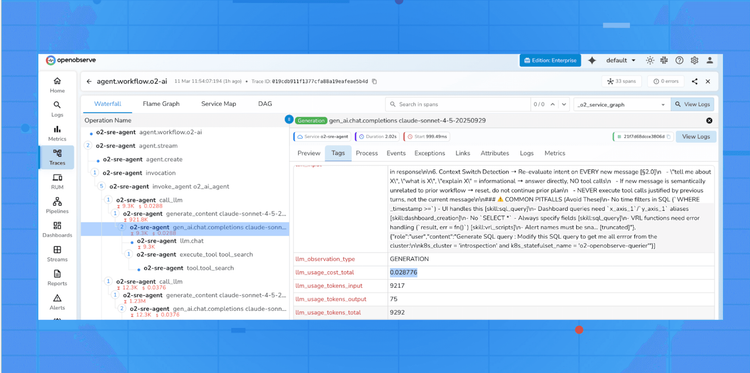
Once events start flowing in, You can check the log stream:
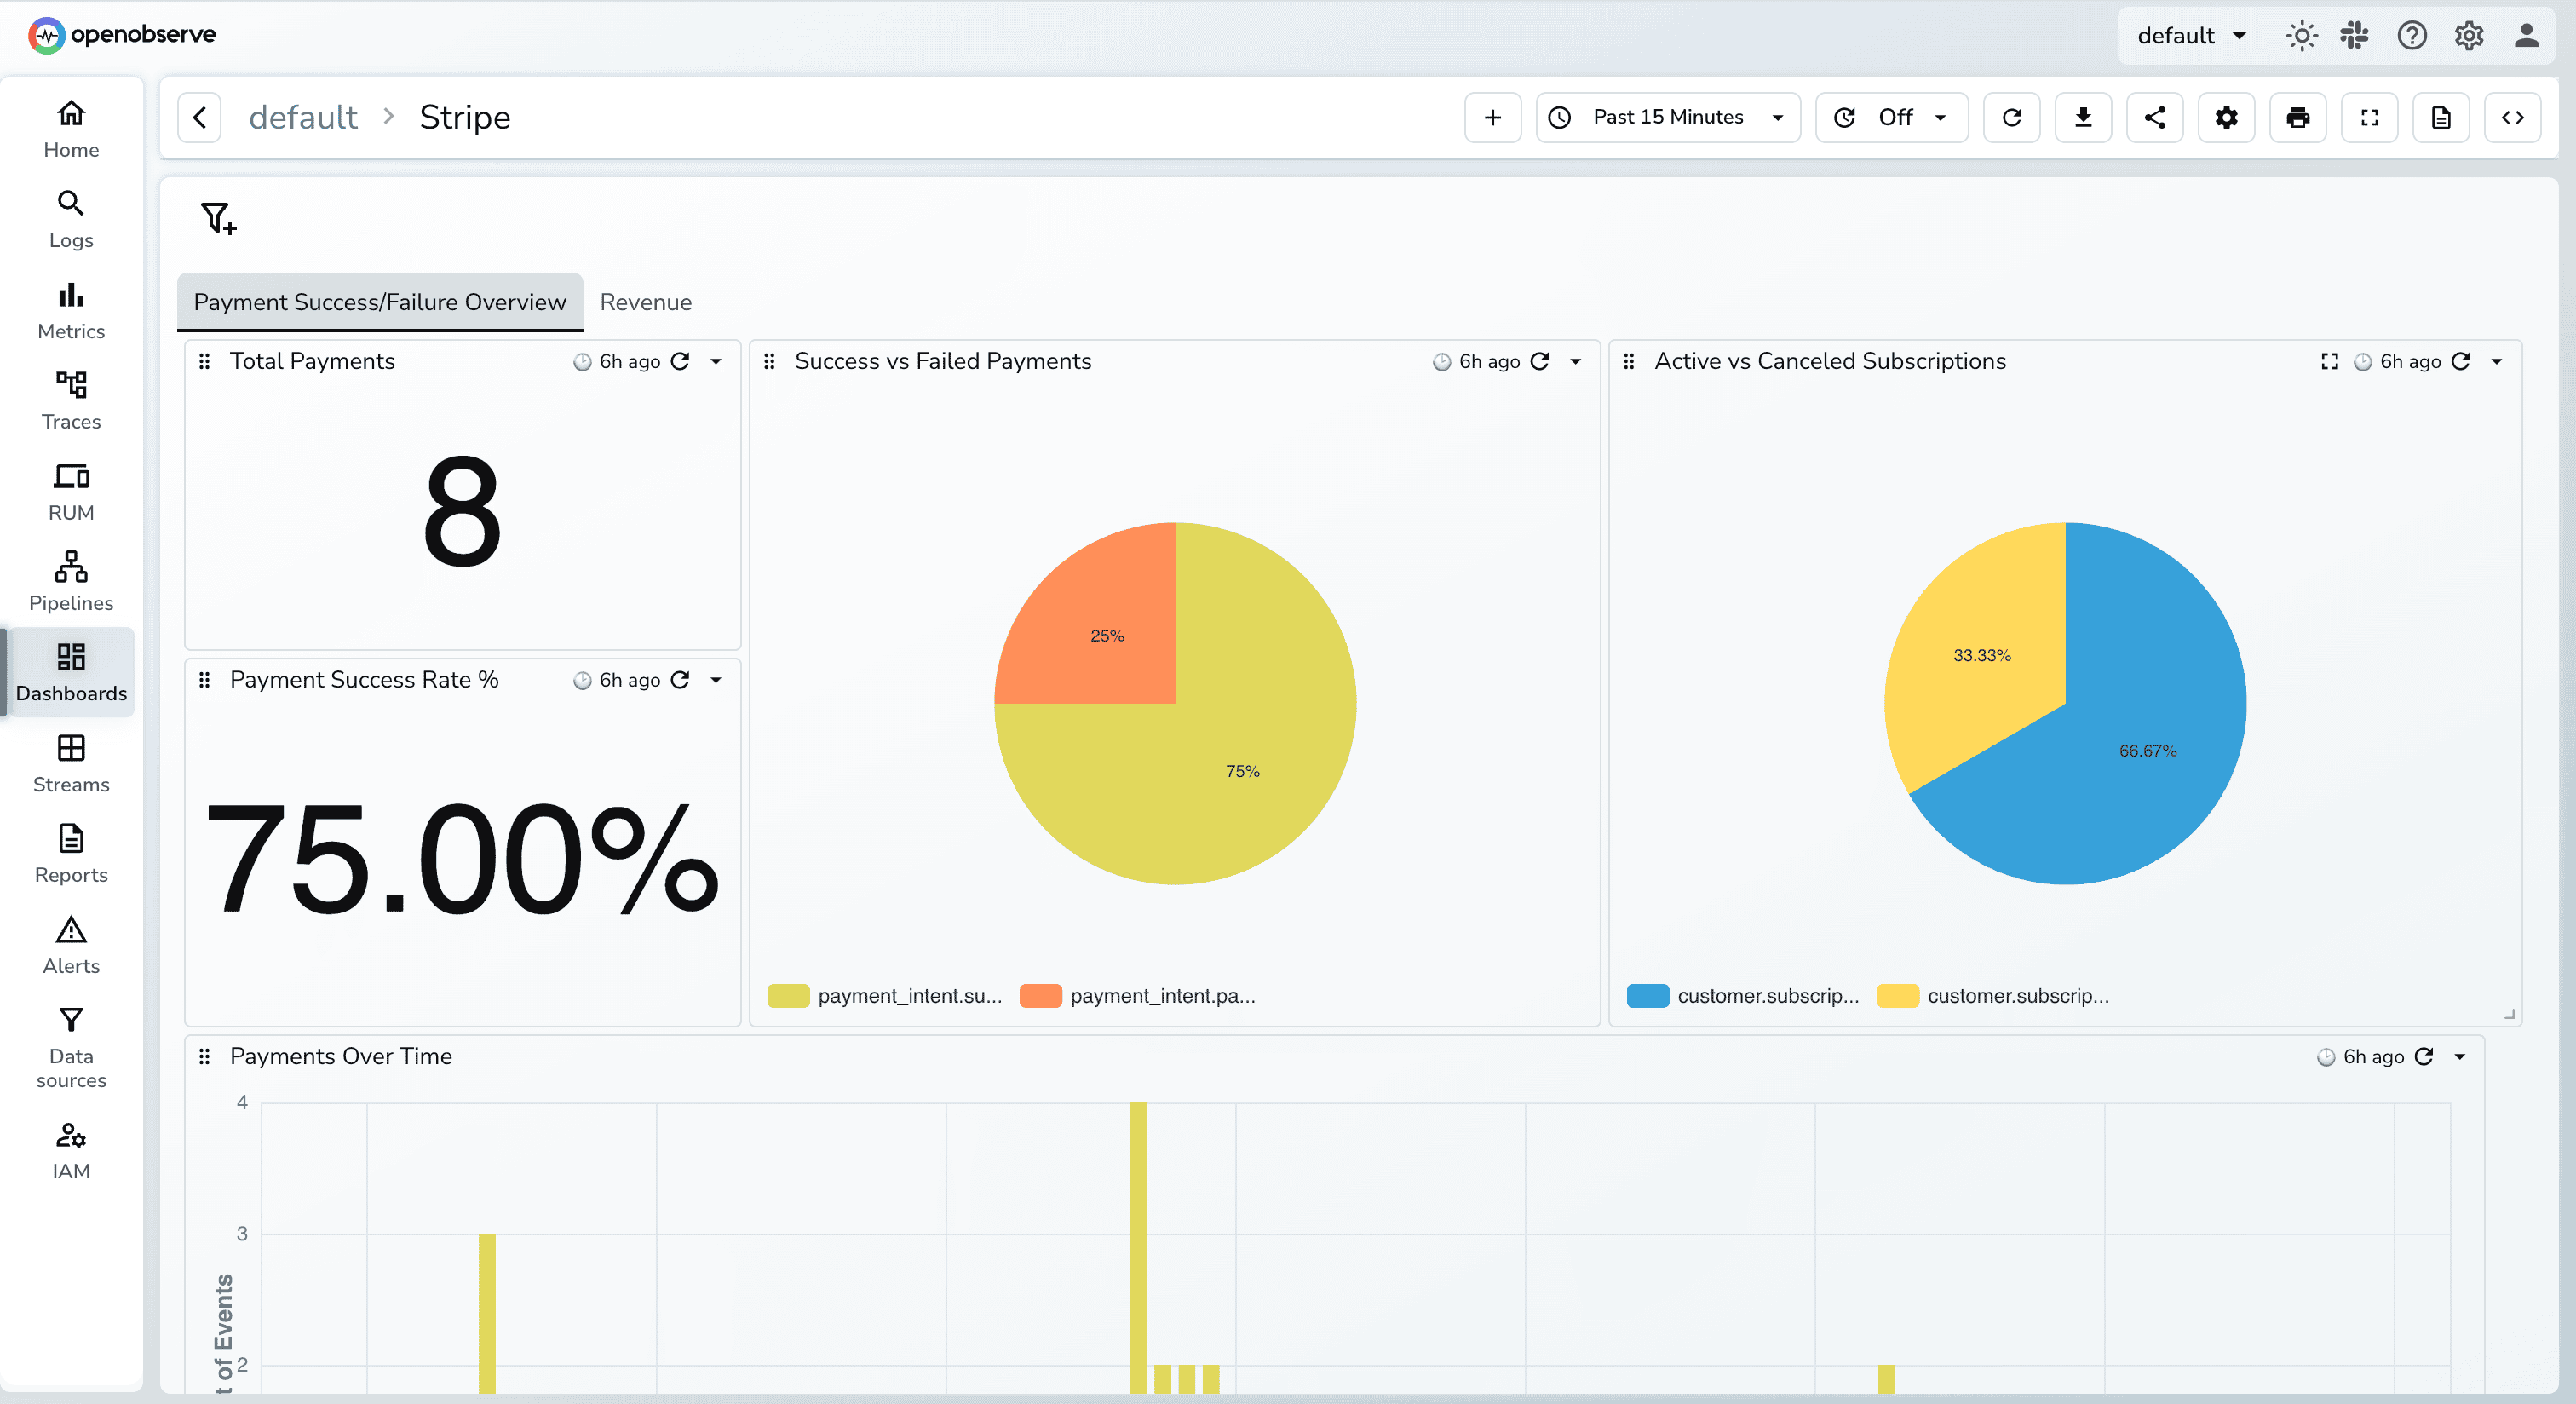
You can also import this dashboard directly from the OpenObserve Community Dashboards
Stripe gives you excellent visibility into transactions, but real observability requires more than a dashboard. By streaming raw Stripe events into OpenObserve, you unlock full end-to-end insights: what happened, why it happened, and how it connects to the rest of your system.
With this setup:
Once Stripe events live inside OpenObserve, you can build dashboards, alerts, SLOs, and investigations exactly the same way you do for any other backend system giving you production-grade monitoring for your revenue pipeline.
Give it a try! Sign up for OpenObserve or deploy the open-source version today.
1. Can I send Stripe events directly to OpenObserve without a backend?
Technically yes , Stripe supports sending webhooks to any URL.Practically no, this is unsafe in production because you cannot verify signatures or protect your ingestion credentials. Always route Stripe webhooks through your backend.
2. What events should I capture from Stripe?
Most teams start with:
payment_intent.succeededpayment_intent.payment_failedcharge.refundedinvoice.payment_failedcharge.dispute.createdBut production systems often log all events to maintain an audit trail and build richer dashboards.
3. How much latency does this add to my system?
Zero. Your backend immediately returns 200 OK to Stripe, and event forwarding happens asynchronously. Stripe never waits for your OpenObserve ingestion.
4. Do I need to transform the Stripe event before sending it?
No, Stripe sends clean, well-structured JSON. But many teams enrich the event with: internal user IDs, deployment version, request latency, processed_at timestamp. This helps correlate Stripe data with backend events inside OpenObserve.
5. Is this approach scalable for high-volume Stripe apps?
Yes. Stripe webhooks are light, your queue absorbs spikes, and OpenObserve handles large JSON ingestion at scale. This setup is used by real production systems processing thousands of events per minute.
6. How much data volume does Stripe generate, and will it be expensive to store in OpenObserve?
The data volume per event is very small (typically a few KB of JSON). Even high-volume apps processing thousands of transactions per minute will only generate a few GB of log data per day. Because OpenObserve is architected for extreme storage cost efficiency using columnar storage, the cost of retaining this payment history for months or years is significantly lower compared to traditional log management solutions.
7. Is the OpenObserve API Key secure when sending webhooks?
Yes, when implemented correctly. The ingestion process uses HTTPS (encryption) and Basic Authentication (username/API key). Since the forwarding happens from your secured backend worker (Step 4), the API key is never exposed to the public internet or to Stripe; it remains securely within your trusted network environment.
Passionate about observability, AI systems, and cloud-native tools. All in on DevOps and improving the developer experience.