How to Deploy OpenObserve on AWS ECS Fargate



Ready to get started?
Try OpenObserve Cloud today for more efficient and performant observability.
TL;DR
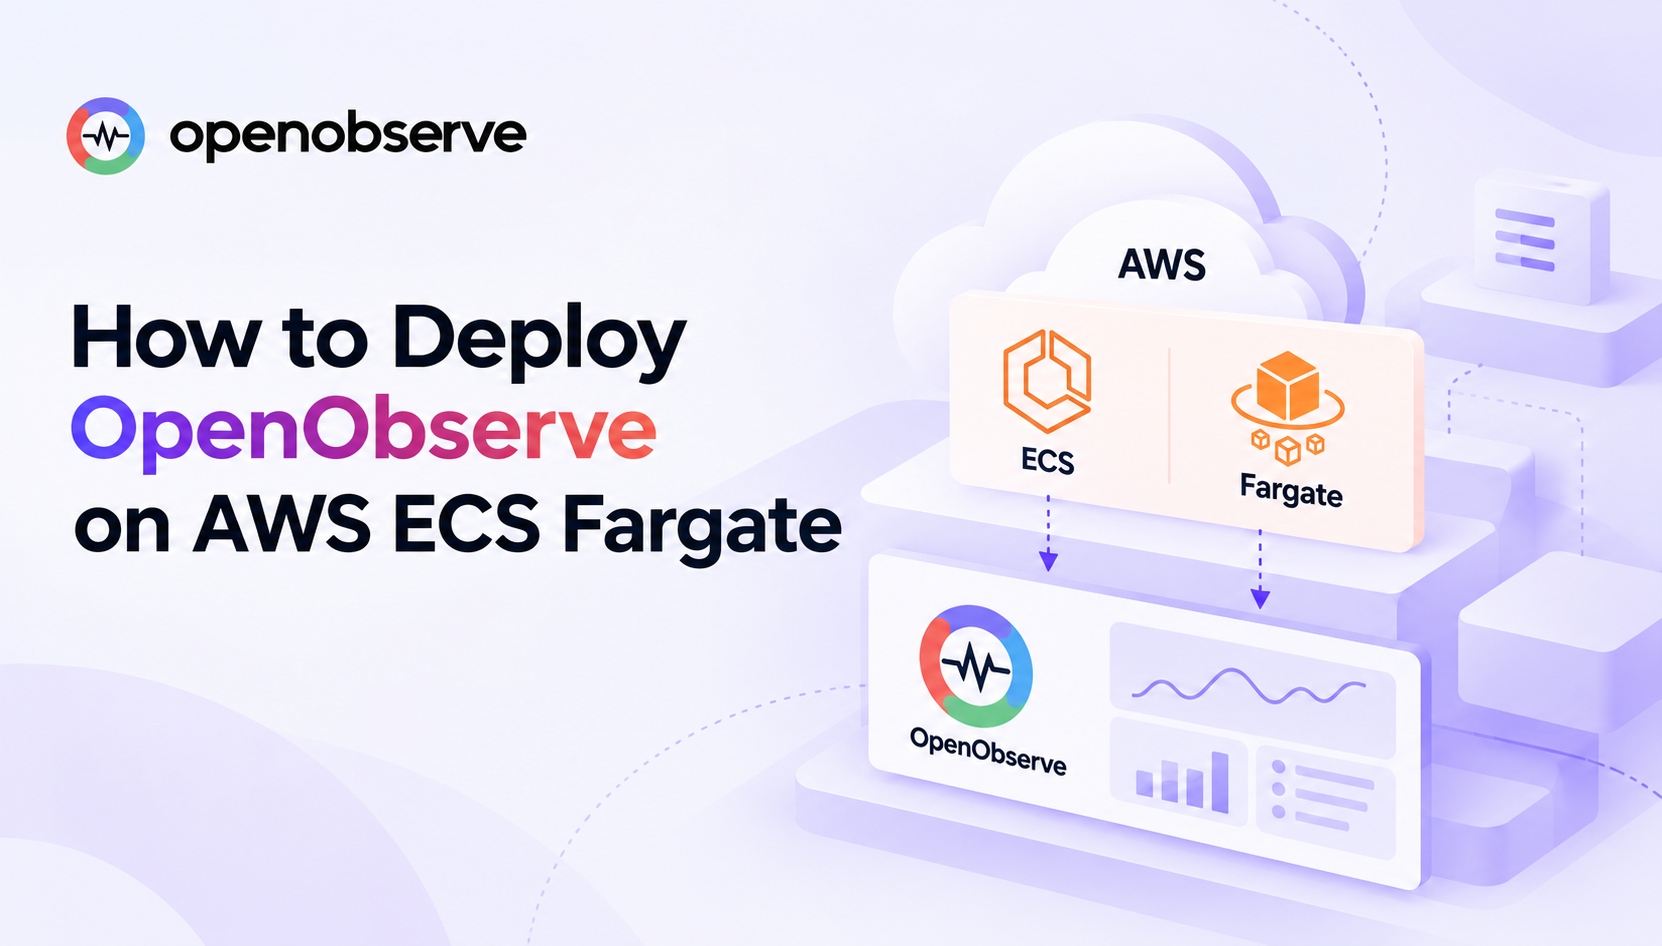
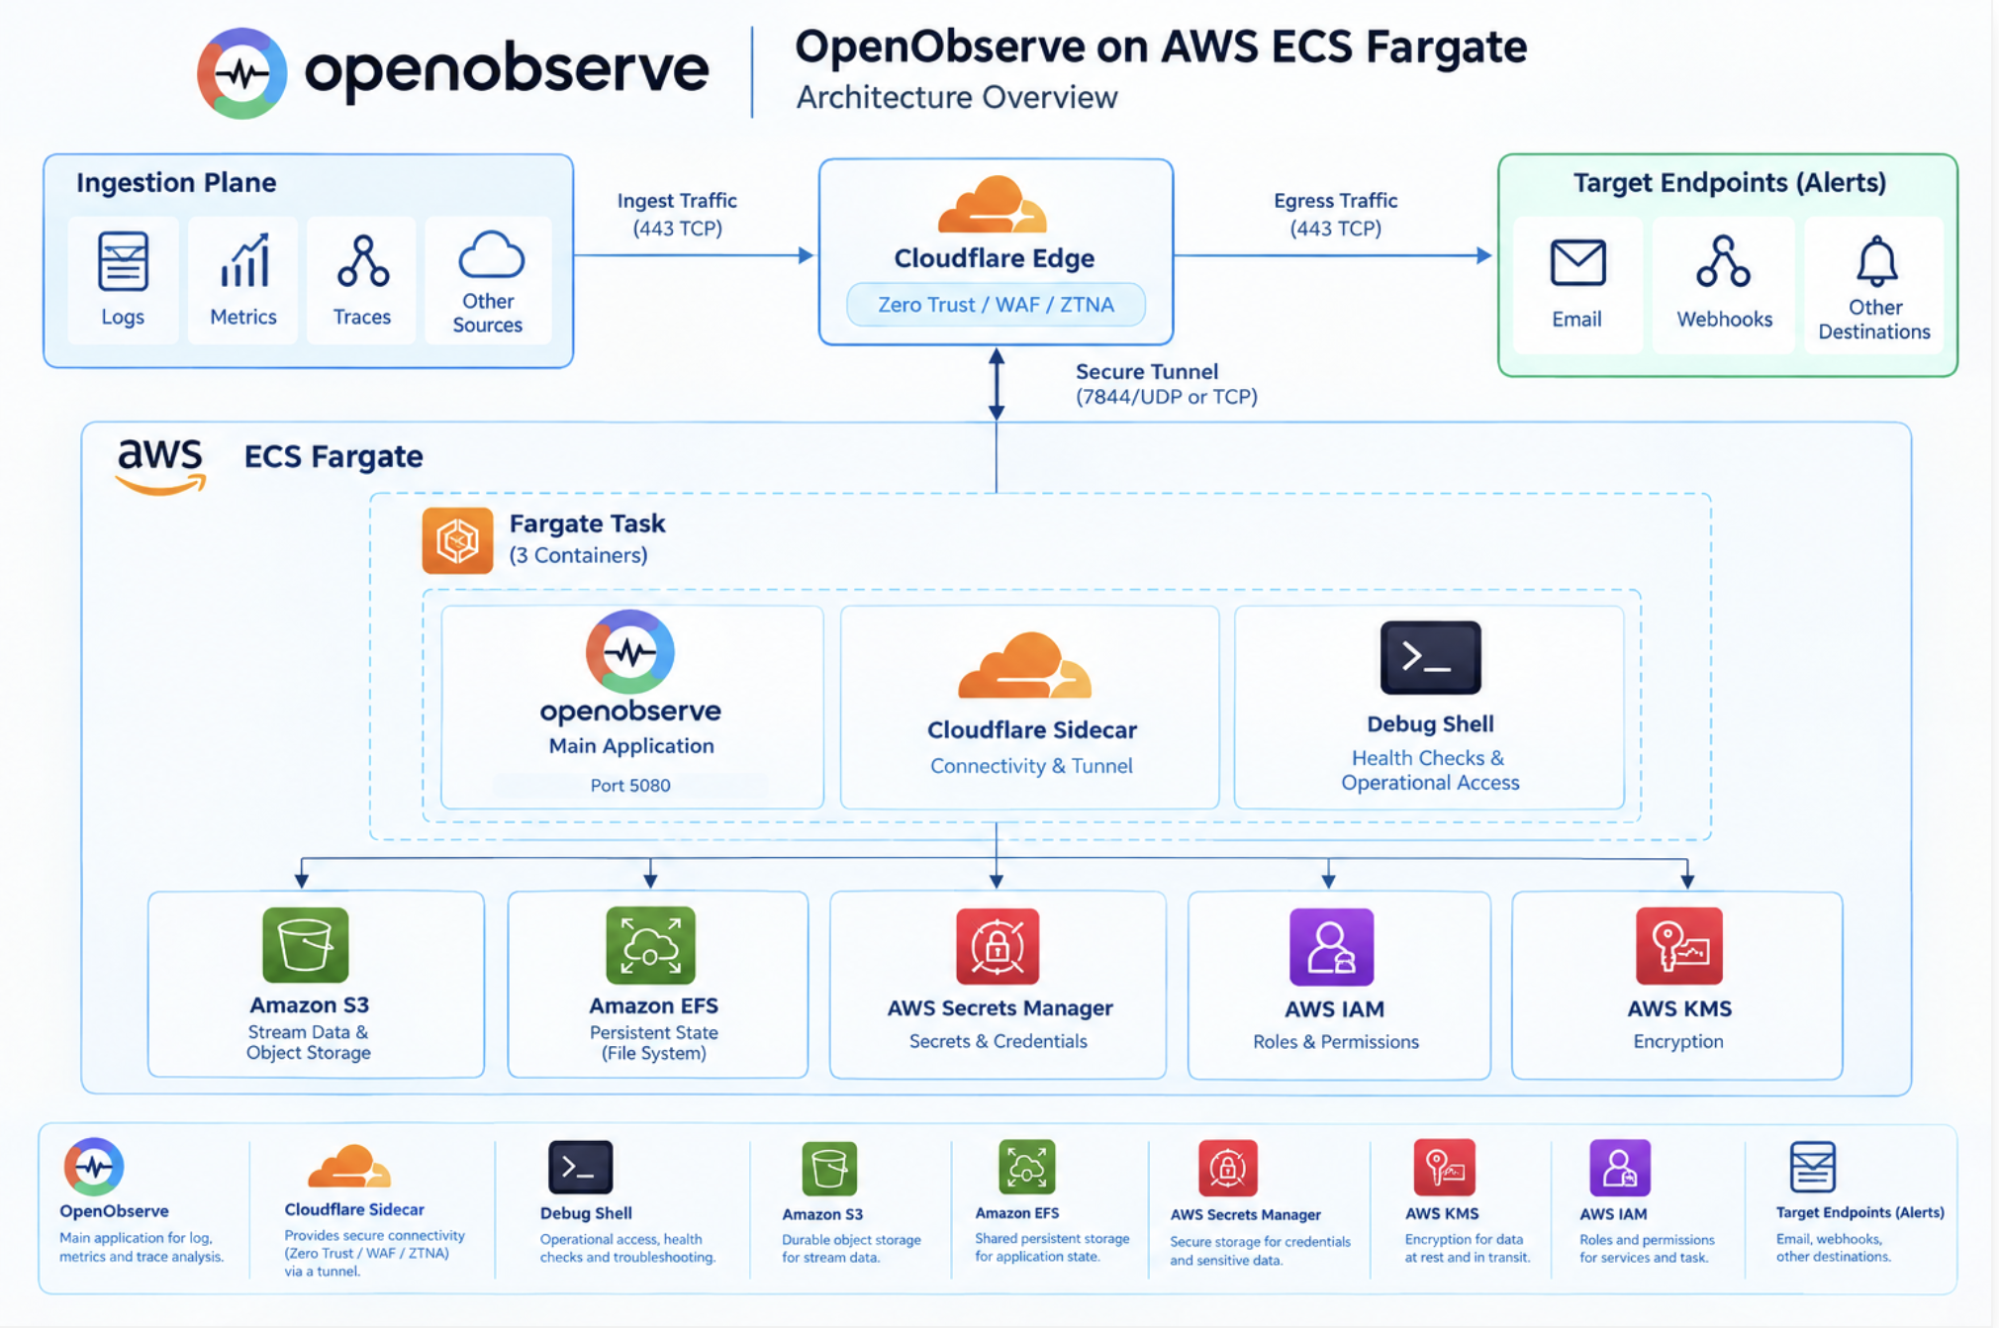
- OpenObserve runs on AWS ECS Fargate as one task with three containers: OpenObserve, a Cloudflare tunnel sidecar, and a debug shell that runs the health check.
- The ECS task definition is the blueprint: this guide builds it in 10 steps, from task sizing to the complete JSON you register.
- Durable data lives outside the task: S3 stores stream data, EFS keeps filesystem state, Secrets Manager holds credentials, and IAM roles grant permissions.
- The task is disposable: when ECS replaces it, OpenObserve comes back with its data intact.
- Dex SSO is an optional add-on for OpenObserve Enterprise and does not change the storage design.
OpenObserve ships as a container image, which makes AWS ECS Fargate a natural place to run it: you get a managed container runtime without looking after any servers.
Running OpenObserve on Fargate is straightforward once the responsibilities of the infrastructure are separated correctly. A production-ready deployment needs more than a running container: compute, storage, secrets, networking, health checks, logging, and operational access all need to be defined somewhere. On ECS, that place is the task definition, so this guide builds it one piece at a time. By the end you will have a complete task definition you can register and run.
How the deployment fits together
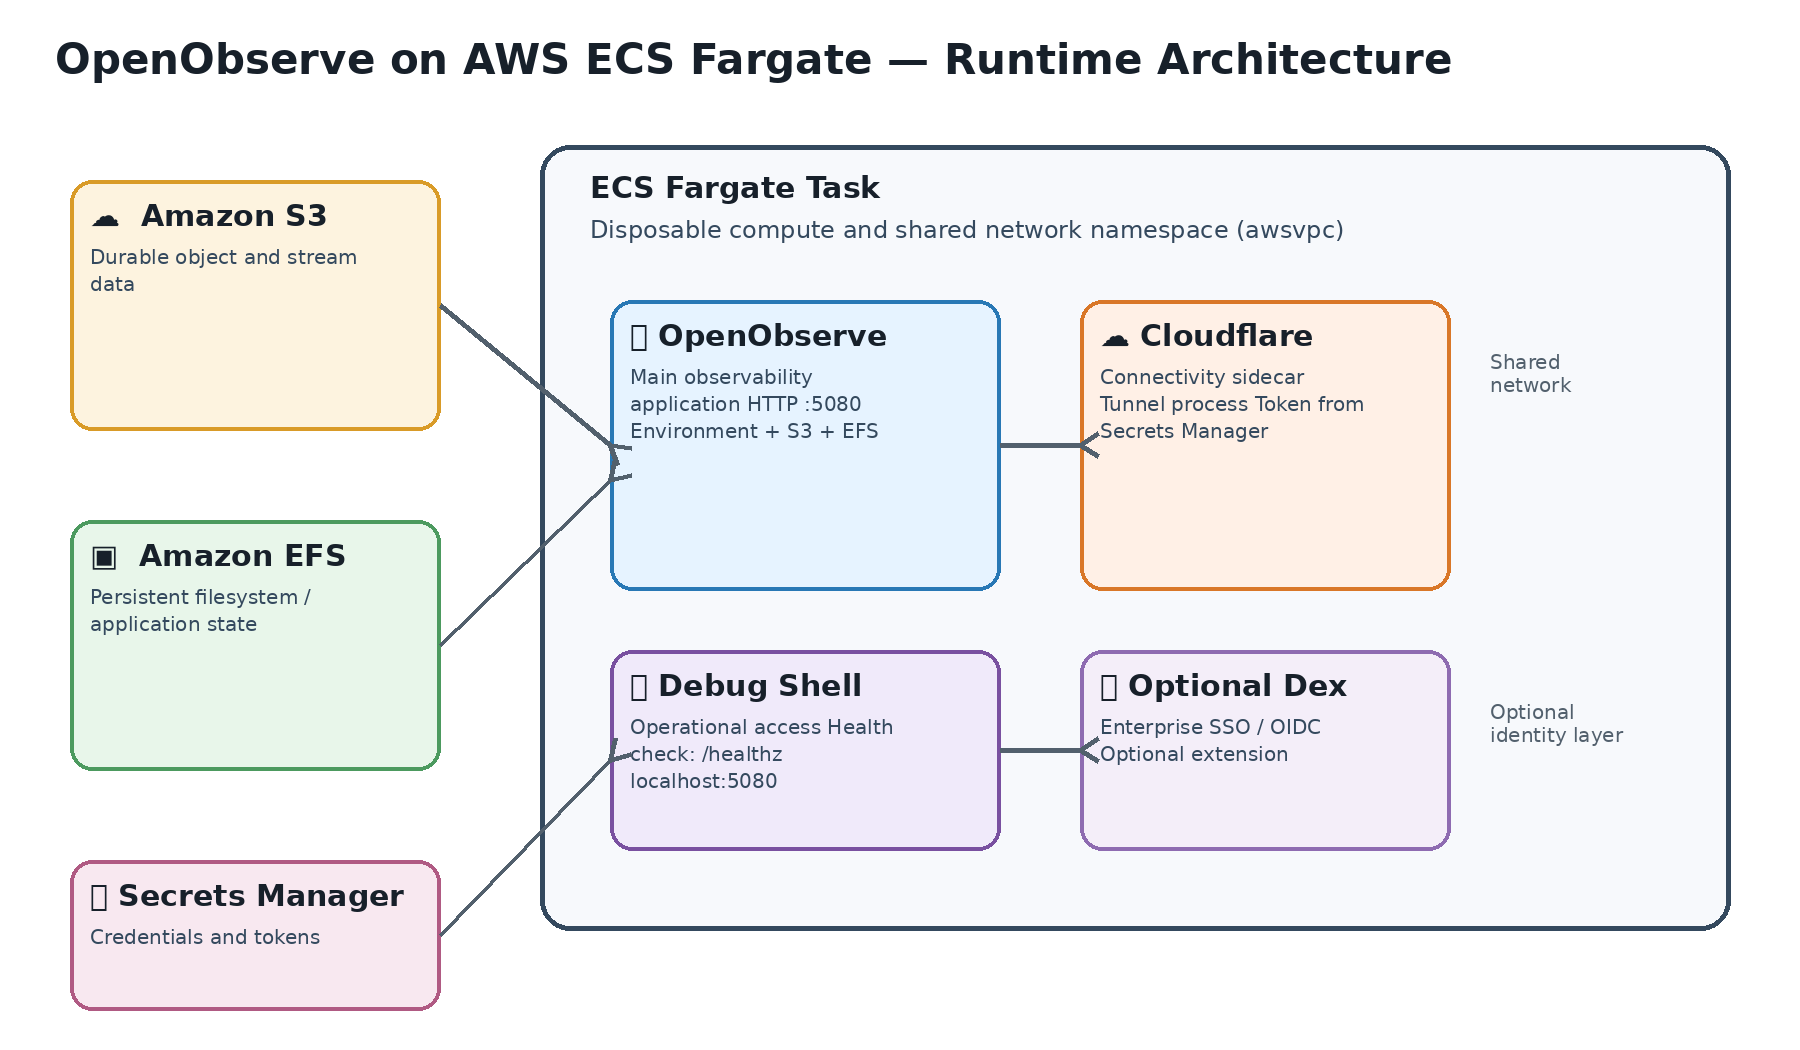
The ECS task is intentionally disposable: containers can be replaced at any time, while persistent data and configuration live in services outside the task. The task runs three containers:
ECS Fargate Task
│
├── OpenObserve   → main application (port 5080)
├── Cloudflare    → connectivity sidecar
└── Debug Shell   → health checks + operational access
And it connects to infrastructure that outlives it:
                         ECS Fargate Task
                               │
             ┌─────────────────┼─────────────────┐
             │                 │                 │
        OpenObserve         Cloudflare       Debug Shell
             │                                   │
       ┌─────┴─────┐                             │
       ▼           ▼                             ▼
      S3          EFS                        localhost
Object Storage  Persistent State              :5080
The principle to keep in mind throughout: Fargate owns the application runtime; durable infrastructure owns the state and data that must survive task replacement.
Before you begin
The task definition references a few AWS resources. Have these ready (or their names and ARNs) before you start:
- An S3 bucket for OpenObserve stream data
- An EFS filesystem for persistent state
- Secrets Manager secrets for the root user email, root user password, and Cloudflare tunnel token
- Two IAM roles: a task execution role and a task role
- A CloudWatch log group for container logs
- A Cloudflare tunnel and its token
Every snippet below uses <PLACEHOLDERS> for environment-specific values. Replace them with your own.
Step 1: Set the task-level compute and storage
Start with the resources the whole task gets. These are shared by all three containers according to their individual reservations and limits.
{
  "cpu": "<TASK_CPU_UNITS>",
  "memory": "<TASK_MEMORY_MB>",
  "requiresCompatibilities": ["FARGATE"],
  "networkMode": "awsvpc",
  "runtimePlatform": {
    "cpuArchitecture": "<CPU_ARCHITECTURE>",
    "operatingSystemFamily": "<OS_FAMILY>"
  },
  "ephemeralStorage": {
    "sizeInGiB": "<EPHEMERAL_STORAGE_GIB>"
  }
}
The example deployment uses a 4 vCPU / 8 GB task (4096 CPU units, 8192 MB memory) with 50 GiB of ephemeral storage. Treat these as a starting point, not universal requirements: the right size depends on ingestion volume, query concurrency, enrichment workloads, and API usage.
Ephemeral storage is tied to the task's lifecycle, so it is lost when the task is replaced. Use it only for temporary data. Durable data goes to EFS and S3, which you set up in Step 4.
Step 2: Add the OpenObserve container
OpenObserve is the primary application container:
{
  "name": "openobserve",
  "image": "<OPENOBSERVE_IMAGE>",
  "cpu": "<OPENOBSERVE_CPU_UNITS>",
  "memory": "<OPENOBSERVE_MEMORY_MB>",
  "memoryReservation": "<OPENOBSERVE_MEMORY_RESERVATION_MB>",
  "essential": false,
  "portMappings": [
    { "containerPort": 5080, "hostPort": 5080, "protocol": "tcp" }
  ]
}
Pin the image to a specific version in production rather than relying on an unqualified latest tag.
OpenObserve listens on port 5080 inside the task. The port mapping alone does not make OpenObserve publicly reachable. Security groups, routing, load balancers, or (in this setup) Cloudflare decide how external traffic gets in.
Step 3: Configure OpenObserve with environment variables
Add OpenObserve's settings to the same container:
"environment": [
  { "name": "ZO_LOG_LEVEL", "value": "<LOG_LEVEL>" },
  { "name": "ZO_MAX_CONCURRENT_QUERIES", "value": "<MAX_CONCURRENT_QUERIES>" },
  { "name": "ZO_ENRICHMENT_TABLE_LIMIT", "value": "<ENRICHMENT_TABLE_LIMIT>" },
  { "name": "ZO_PAYLOAD_LIMIT", "value": "<PAYLOAD_LIMIT>" },
  { "name": "ZO_DATA_DIR", "value": "/data" },
  { "name": "ZO_OBJECT_STORE", "value": "s3" },
  { "name": "ZO_LOCAL_MODE_STORAGE", "value": "s3" },
  { "name": "ZO_S3_REGION_NAME", "value": "<AWS_REGION>" },
  { "name": "ZO_S3_BUCKET_NAME", "value": "<S3_BUCKET_NAME>" }
]
Tune limits to your workload. In the source deployment, ZO_ENRICHMENT_TABLE_LIMIT and ZO_PAYLOAD_LIMIT are set higher than the defaults because OpenObserve's API is used for an automated CSV ingestion workflow with large datasets. A conventional log-ingestion setup may need very different values, so don't copy fixed numbers blindly. Always check variable names against the OpenObserve environment variable reference for the release you deploy.
Step 4: Attach persistent storage (EFS and S3)
The last four environment variables above point OpenObserve at S3, its object storage backend for durable stream data.
For filesystem state, mount an EFS volume at /data (the ZO_DATA_DIR you set above). In the OpenObserve container:
"mountPoints": [
  { "containerPath": "/data", "sourceVolume": "efs-data" }
]
And at the task level:
"volumes": [
  {
    "name": "efs-data",
    "efsVolumeConfiguration": {
      "fileSystemId": "<EFS_FILE_SYSTEM_ID>",
      "transitEncryption": "ENABLED",
      "authorizationConfig": { "iam": "ENABLED" }
    }
  }
]
The EFS filesystem exists independently of the task. When ECS replaces the task, its local filesystem disappears, but the replacement task mounts the same EFS filesystem. Each storage type has a different job:
| Storage | Purpose | Survives task replacement? |
|---|---|---|
| Fargate ephemeral storage | Temporary / scratch data | No |
| EFS | Persistent filesystem / application state | Yes |
| S3 | OpenObserve object / stream data | Yes |
Step 5: Assign the IAM roles
The task definition references two roles with separate responsibilities:
{
  "executionRoleArn": "<ECS_TASK_EXECUTION_ROLE_ARN>",
  "taskRoleArn": "<ECS_TASK_ROLE_ARN>"
}
- Task execution role: used by ECS and Fargate themselves, for example to pull images, deliver logs, and retrieve referenced secrets.
- Task role: gives AWS permissions to the applications inside the task. This is what lets OpenObserve access S3.
Use IAM permissions like this instead of embedding long-lived AWS credentials in the container.
Step 6: Inject credentials from Secrets Manager
Never put sensitive values in the environment section. Instead, reference them from Secrets Manager so ECS injects them at startup:
"secrets": [
  { "name": "ZO_ROOT_USER_EMAIL", "valueFrom": "<ROOT_USER_EMAIL_SECRET_REFERENCE>" },
  { "name": "ZO_ROOT_USER_PASSWORD", "valueFrom": "<ROOT_USER_PASSWORD_SECRET_REFERENCE>" }
]
The task definition now describes where a secret comes from, not the secret itself:
Task Definition ──references──▶ Secrets Manager ──holds──▶ Actual credential
Step 7: Add the Cloudflare connectivity sidecar
The second container runs a Cloudflare tunnel. This is the sidecar pattern: one container provides the application, another provides connectivity, so the OpenObserve image doesn't need any Cloudflare tooling.
{
  "name": "cloudflare",
  "image": "<CLOUDFLARE_IMAGE>",
  "cpu": "<CLOUDFLARE_CPU_UNITS>",
  "memory": "<CLOUDFLARE_MEMORY_MB>",
  "essential": false,
  "command": ["tunnel", "--no-autoupdate", "run"],
  "secrets": [
    { "name": "TUNNEL_TOKEN", "valueFrom": "<CLOUDFLARE_TUNNEL_TOKEN_SECRET_REFERENCE>" }
  ]
}
Then tell ECS to start Cloudflare before OpenObserve by adding this to the OpenObserve container:
"dependsOn": [
  { "condition": "START", "containerName": "cloudflare" }
]
Note that START only sets the startup order. It does not wait for the tunnel to be healthy or ready for traffic.
Step 8: Add the debug shell and health check
The third container is intentionally simple. It stays running so operators have a shell for troubleshooting, and it runs the task's HTTP health check against OpenObserve:
{
  "name": "debug-shell",
  "image": "<DEBUG_SHELL_IMAGE>",
  "essential": true,
  "entryPoint": ["sh", "-lc"],
  "command": ["sleep infinity"],
  "healthCheck": {
    "command": ["CMD-SHELL", "curl -sf http://localhost:5080/healthz || exit 1"],
    "interval": 30,
    "retries": 5,
    "startPeriod": 180,
    "timeout": 5
  }
}
Why localhost works: with awsvpc networking, all containers in a task share the same network namespace, so the debug shell reaches OpenObserve at http://localhost:5080.
Step 9: Configure logging and scratch space
Send each container's logs to CloudWatch with the awslogs driver, using a different stream prefix per container so application, tunnel, and operational logs are easy to tell apart:
"logConfiguration": {
  "logDriver": "awslogs",
  "options": {
    "awslogs-group": "<CLOUDWATCH_LOG_GROUP>",
    "awslogs-region": "<AWS_REGION>",
    "awslogs-stream-prefix": "<LOG_STREAM_PREFIX>"
  }
}
Logs already delivered to CloudWatch stay available after a task is replaced, according to your log group's retention policy.
Finally, add a task-local scratch volume and mount it at /scratch in both the OpenObserve and debug-shell containers. It gives them shared temporary space. Don't confuse it with efs-data: scratch is lost with the task, EFS is not.
{ "name": "scratch", "host": {} }
Step 10: Assemble and register the task definition
Put all the pieces together into one file, for example openobserve-ecs-task-definition.json. Here is the complete version with placeholders:
{
  "family": "<ECS_TASK_FAMILY>",
  "cpu": "<TASK_CPU_UNITS>",
  "memory": "<TASK_MEMORY_MB>",
  "ephemeralStorage": { "sizeInGiB": "<EPHEMERAL_STORAGE_GIB>" },
  "networkMode": "awsvpc",
  "requiresCompatibilities": ["FARGATE"],
  "runtimePlatform": {
    "cpuArchitecture": "<CPU_ARCHITECTURE>",
    "operatingSystemFamily": "<OS_FAMILY>"
  },
  "executionRoleArn": "<ECS_TASK_EXECUTION_ROLE_ARN>",
  "taskRoleArn": "<ECS_TASK_ROLE_ARN>",
  "containerDefinitions": [
    {
      "name": "openobserve",
      "image": "<OPENOBSERVE_IMAGE>",
      "cpu": "<OPENOBSERVE_CPU_UNITS>",
      "memory": "<OPENOBSERVE_MEMORY_MB>",
      "memoryReservation": "<OPENOBSERVE_MEMORY_RESERVATION_MB>",
      "essential": false,
      "dependsOn": [{ "condition": "START", "containerName": "cloudflare" }],
      "environment": [
        { "name": "ZO_LOG_LEVEL", "value": "<LOG_LEVEL>" },
        { "name": "ZO_MAX_CONCURRENT_QUERIES", "value": "<MAX_CONCURRENT_QUERIES>" },
        { "name": "ZO_ENRICHMENT_TABLE_LIMIT", "value": "<ENRICHMENT_TABLE_LIMIT>" },
        { "name": "ZO_PAYLOAD_LIMIT", "value": "<PAYLOAD_LIMIT>" },
        { "name": "ZO_DATA_DIR", "value": "/data" },
        { "name": "ZO_OBJECT_STORE", "value": "s3" },
        { "name": "ZO_LOCAL_MODE_STORAGE", "value": "s3" },
        { "name": "ZO_S3_REGION_NAME", "value": "<AWS_REGION>" },
        { "name": "ZO_S3_BUCKET_NAME", "value": "<S3_BUCKET_NAME>" }
      ],
      "secrets": [
        { "name": "ZO_ROOT_USER_EMAIL", "valueFrom": "<ROOT_USER_EMAIL_SECRET_REFERENCE>" },
        { "name": "ZO_ROOT_USER_PASSWORD", "valueFrom": "<ROOT_USER_PASSWORD_SECRET_REFERENCE>" }
      ],
      "linuxParameters": { "initProcessEnabled": true },
      "mountPoints": [
        { "containerPath": "/scratch", "sourceVolume": "scratch" },
        { "containerPath": "/data", "sourceVolume": "efs-data" }
      ],
      "portMappings": [{ "containerPort": 5080, "hostPort": 5080, "protocol": "tcp" }],
      "logConfiguration": {
        "logDriver": "awslogs",
        "options": {
          "awslogs-group": "<CLOUDWATCH_LOG_GROUP>",
          "awslogs-region": "<AWS_REGION>",
          "awslogs-stream-prefix": "<OPENOBSERVE_LOG_STREAM_PREFIX>"
        }
      }
    },
    {
      "name": "cloudflare",
      "image": "<CLOUDFLARE_IMAGE>",
      "cpu": "<CLOUDFLARE_CPU_UNITS>",
      "memory": "<CLOUDFLARE_MEMORY_MB>",
      "memoryReservation": "<CLOUDFLARE_MEMORY_RESERVATION_MB>",
      "essential": false,
      "command": ["tunnel", "--no-autoupdate", "run"],
      "secrets": [
        { "name": "TUNNEL_TOKEN", "valueFrom": "<CLOUDFLARE_TUNNEL_TOKEN_SECRET_REFERENCE>" }
      ],
      "linuxParameters": { "initProcessEnabled": true },
      "logConfiguration": {
        "logDriver": "awslogs",
        "options": {
          "awslogs-group": "<CLOUDWATCH_LOG_GROUP>",
          "awslogs-region": "<AWS_REGION>",
          "awslogs-stream-prefix": "<CLOUDFLARE_LOG_STREAM_PREFIX>"
        }
      }
    },
    {
      "name": "debug-shell",
      "image": "<DEBUG_SHELL_IMAGE>",
      "cpu": "<DEBUG_SHELL_CPU_UNITS>",
      "memory": "<DEBUG_SHELL_MEMORY_MB>",
      "memoryReservation": "<DEBUG_SHELL_MEMORY_RESERVATION_MB>",
      "essential": true,
      "entryPoint": ["sh", "-lc"],
      "command": ["sleep infinity"],
      "linuxParameters": { "initProcessEnabled": true },
      "healthCheck": {
        "command": ["CMD-SHELL", "curl -sf http://localhost:5080/healthz || exit 1"],
        "interval": 30,
        "retries": 5,
        "startPeriod": 180,
        "timeout": 5
      },
      "mountPoints": [{ "containerPath": "/scratch", "sourceVolume": "scratch" }],
      "logConfiguration": {
        "logDriver": "awslogs",
        "options": {
          "awslogs-group": "<CLOUDWATCH_LOG_GROUP>",
          "awslogs-region": "<AWS_REGION>",
          "awslogs-stream-prefix": "<DEBUG_SHELL_LOG_STREAM_PREFIX>"
        }
      }
    }
  ],
  "volumes": [
    { "name": "scratch", "host": {} },
    {
      "name": "efs-data",
      "efsVolumeConfiguration": {
        "fileSystemId": "<EFS_FILE_SYSTEM_ID>",
        "transitEncryption": "ENABLED",
        "authorizationConfig": { "iam": "ENABLED" }
      }
    }
  ]
}
Register it with ECS:
aws ecs register-task-definition --cli-input-json file://openobserve-ecs-task-definition.json
Then run it as a Fargate service in your ECS cluster. Once the debug shell's health check reports HEALTHY, OpenObserve is up and reachable through your Cloudflare tunnel.
Optional: add Dex SSO for OpenObserve Enterprise
Dex is an optional extension, not a prerequisite. Adding it introduces an authentication layer but does not change the storage architecture: OpenObserve still uses EFS and S3.
ECS Fargate Task
├── OpenObserve   :5080
├── Dex           :5556   ← optional
├── Cloudflare    tunnel
└── Debug Shell   health check
To enable it:
- Switch to the Enterprise image, pinned to a version:
public.ecr.aws/zinclabs/openobserve-enterprise:<OPENOBSERVE_VERSION>. - Add the Dex environment variables to the OpenObserve container:
"environment": [
  { "name": "O2_DEX_ENABLED", "value": "<DEX_ENABLED>" },
  { "name": "O2_DEX_CLIENT_ID", "value": "<DEX_CLIENT_ID>" },
  { "name": "O2_DEX_BASE_URL", "value": "https://<OPENOBSERVE_BASE_URL>/dex" },
  { "name": "O2_DEX_REDIRECT_URL", "value": "https://<OPENOBSERVE_BASE_URL>/config/redirect" },
  { "name": "O2_CALLBACK_URL", "value": "https://<OPENOBSERVE_BASE_URL>/web/cb" },
  { "name": "O2_DEX_SCOPES", "value": "<DEX_SCOPES>" },
  { "name": "O2_DEX_DEFAULT_ORG", "value": "<DEX_DEFAULT_ORG>" },
  { "name": "O2_DEX_GROUP_ATTRIBUTE", "value": "<DEX_GROUP_ATTRIBUTE>" },
  { "name": "O2_DEX_ROLE_ATTRIBUTE", "value": "<DEX_ROLE_ATTRIBUTE>" },
  { "name": "O2_DEX_NATIVE_ACCEPT_INVALID_CERTS", "value": "<ACCEPT_INVALID_CERTS>" }
]
- Inject the Dex client secret from Secrets Manager, never in
environment:
"secrets": [
  { "name": "O2_DEX_CLIENT_SECRET", "valueFrom": "<DEX_CLIENT_SECRET_REFERENCE>" }
]
- Provide a Dex configuration file to the Dex sidecar through a task volume or another configuration mechanism. Keep it separate from the task definition, and never commit real identity-provider secrets to source control:
issuer: https://<DEX_BASE_URL>/dex

storage:
  type: sqlite3
  config:
    file: <DEX_DATABASE_PATH>

web:
  http: 0.0.0.0:<DEX_PORT>
  # Configure TLS only when Dex is responsible for TLS termination.
  tlsKey: <DEX_TLS_KEY_PATH>
  tlsCert: <DEX_TLS_CERT_PATH>
  cookieSameSite: None
  cookieSecure: true

logger:
  level: <DEX_LOG_LEVEL>
  format: text

expiry:
  deviceRequests: <DEVICE_REQUEST_EXPIRY>
  signingKeys: <SIGNING_KEY_EXPIRY>
  idTokens: <ID_TOKEN_EXPIRY>
  authRequests: <AUTH_REQUEST_EXPIRY>

connectors:
- type: oidc
  id: <OIDC_CONNECTOR_ID>
  name: <OIDC_CONNECTOR_NAME>
  config:
    clientID: <OIDC_CLIENT_ID>
    clientSecret: <OIDC_CLIENT_SECRET>
    issuer: <OIDC_ISSUER_URL>
    redirectURI: https://<DEX_BASE_URL>/dex/callback
    scopes: [openid, profile, email, groups]
    claimMapping:
      email: <EMAIL_CLAIM>
      name: <NAME_CLAIM>

staticClients:
- id: openobserve
  name: OpenObserve
  secret: <DEX_STATIC_CLIENT_SECRET>
  redirectURIs:
    - https://<OPENOBSERVE_BASE_URL>/config/redirect
Validate variable names and behavior against the OpenObserve Enterprise version you deploy. See the OpenObserve SSO documentation for supported identity providers.
Using the OpenObserve API for automation
The OpenObserve API works independently of the ECS deployment. In the source setup, a pipeline pushes CSV data through the API for stream configuration, ingestion, and processing, and the results land in S3. The task definition doesn't need to know how that pipeline works; its only job is to provide a stable OpenObserve runtime. That means the ingestion pipeline can evolve without a custom OpenObserve image.
What happens when ECS replaces the task?
This is where the design pays off. When ECS terminates the task, the containers (OpenObserve, Cloudflare, debug shell, and Dex if enabled) and the ephemeral storage disappear. But these remain:
- EFS: persistent filesystem state
- S3: durable OpenObserve data
- Secrets Manager: credentials
- CloudWatch: previously delivered logs
ECS starts a replacement task with the same images, environment, secrets, IAM permissions, EFS mount, and S3 configuration. The runtime is rebuilt; the data never left.
Quick reference: what each component does
| Component | Primary responsibility | Lifecycle |
|---|---|---|
| ECS Fargate task | Runs application containers and shared networking | Disposable |
| OpenObserve | Observability application and HTTP API on port 5080 | Recreated with task |
| Cloudflare sidecar | Connectivity tunnel | Recreated with task |
| Debug shell | Operational shell and HTTP health check | Recreated with task |
| EFS | Persistent filesystem / application state | Independent |
| S3 | Durable object / stream data | Independent |
| Secrets Manager | Credentials and tokens | Independent |
| IAM | Authorization for ECS and applications | Independent |
| CloudWatch | Centralized container logs | Independent |
| Dex (optional) | Enterprise SSO and OIDC identity layer | Optional |
Conclusion
The ECS task definition is the blueprint for the OpenObserve runtime. It defines the containers, compute, networking, startup order, storage mounts, secrets, IAM roles, health checks, and logging the application needs. OpenObserve runs as the main container, Cloudflare provides connectivity as a sidecar, and a debug shell handles health checks and troubleshooting. EFS and S3 keep state and data outside the task, while Secrets Manager and IAM keep credentials and permissions out of the JSON.
The one idea to remember: the Fargate task is disposable; the data and persistent dependencies are not. Once that clicks, the task definition stops looking like a large JSON document and starts looking like what it is: a blueprint for a replaceable OpenObserve environment.
Ready to try it? Get started with OpenObserve or explore the OpenObserve documentation.
Frequently Asked Questions
About the Author
Daniel R.
Follow OpenObserve on Google
Add OpenObserve as a preferred source to see more of our articles in Google Search and Top Stories.