
RUM Setup Guide
This guide walks you through setting up OpenObserve RUM across all supported platforms: Browser (Web), React Native, Android, and iOS.
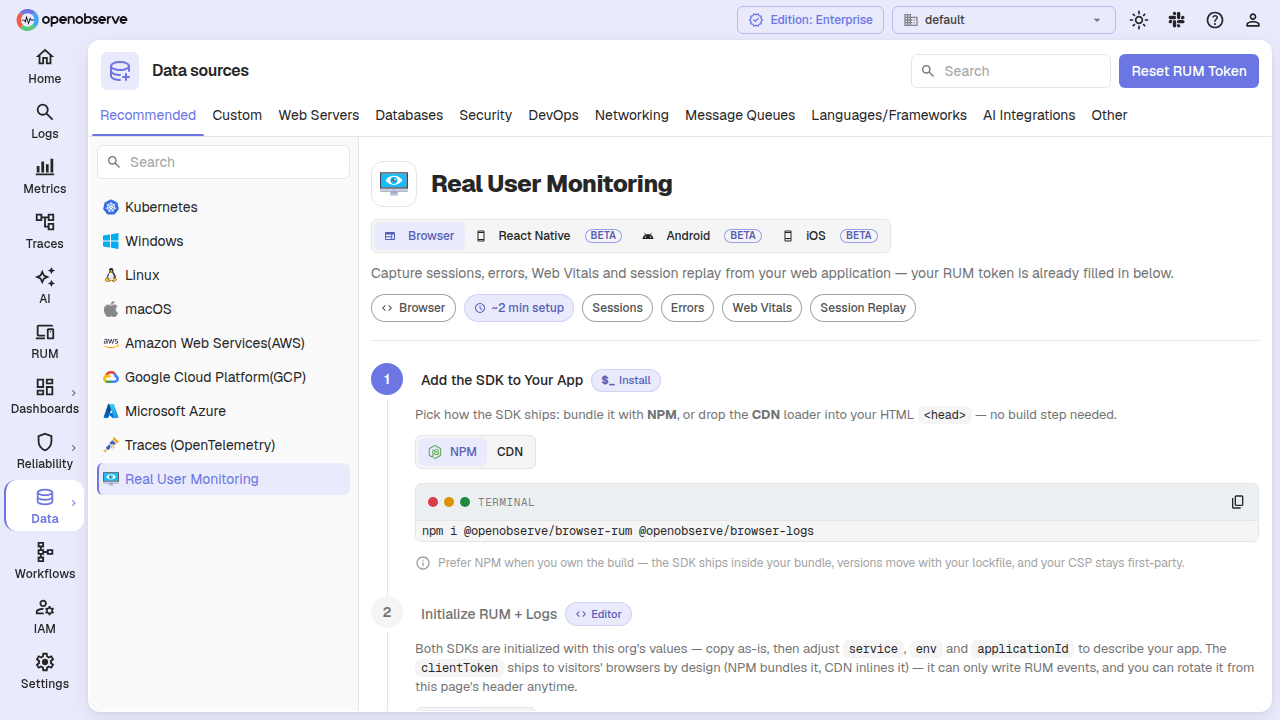
OpenObserve provides an in-app guided setup. From the Ingestion menu, select RUM and use the platform switcher to pick your target. The UI fills in your endpoint, organization, and RUM token automatically.
Prerequisites
- A running OpenObserve instance
- A RUM client token (generated from the Ingestion → RUM page in OpenObserve)
- The application you want to monitor
Browser (Web) Setup
Install the Packages
npm install @openobserve/browser-rum @openobserve/browser-logsOr with yarn:
yarn add @openobserve/browser-rum @openobserve/browser-logsInitialize the SDK
Add the following code to your application's entry point (main.js, index.js, or App.vue):
import { openobserveRum } from '@openobserve/browser-rum';
import { openobserveLogs } from '@openobserve/browser-logs';

const options = {
  clientToken: 'your-client-token-here',
  applicationId: 'web-application-id',
  site: 'localhost:5080',
  service: 'my-web-application',
  env: 'production',
  version: '0.0.1',
  organizationIdentifier: 'default',
  insecureHTTP: true,
  apiVersion: 'v1',
};

openobserveRum.init({
  applicationId: options.applicationId,
  clientToken: options.clientToken,
  site: options.site,
  organizationIdentifier: options.organizationIdentifier,
  service: options.service,
  env: options.env,
  version: options.version,
  trackResources: true,
  trackLongTasks: true,
  trackUserInteractions: true,
  apiVersion: options.apiVersion,
  insecureHTTP: options.insecureHTTP,
  defaultPrivacyLevel: 'allow',
});

openobserveLogs.init({
  clientToken: options.clientToken,
  site: options.site,
  organizationIdentifier: options.organizationIdentifier,
  service: options.service,
  env: options.env,
  version: options.version,
  forwardErrorsToLogs: true,
  insecureHTTP: options.insecureHTTP,
  apiVersion: options.apiVersion,
});

openobserveRum.setUser({
  id: "1",
  name: "Captain Hook",
  email: "captainhook@example.com",
});

openobserveRum.startSessionReplayRecording();
Browser Configuration Options
RUM Configuration
| Option | Type | Required | Description |
|---|---|---|---|
applicationId | string | Yes | A unique identifier for your application |
clientToken | string | Yes | Your OpenObserve RUM client token |
site | string | Yes | Your OpenObserve instance URL (e.g. openobserve.example.com:5080) |
organizationIdentifier | string | Yes | Your organization identifier (usually default) |
service | string | Yes | Name of your service/application |
env | string | Yes | Environment (production, staging, development) |
version | string | Yes | Version of your application |
trackResources | boolean | No | Track loading of resources (images, scripts, CSS). Default: false |
trackLongTasks | boolean | No | Track long-running JavaScript tasks. Default: false |
trackUserInteractions | boolean | No | Track clicks, form submissions, etc. Default: false |
defaultPrivacyLevel | string | No | Privacy level: allow, mask-user-input, or mask. Default: mask-user-input |
insecureHTTP | boolean | No | Set to true for HTTP, false for HTTPS. Default: false |
apiVersion | string | No | API version to use. Default: v1 |
Logs Configuration
| Option | Type | Required | Description |
|---|---|---|---|
clientToken | string | Yes | Your OpenObserve RUM client token |
site | string | Yes | Your OpenObserve instance URL |
organizationIdentifier | string | Yes | Your organization identifier |
service | string | Yes | Name of your service |
env | string | Yes | Environment |
version | string | Yes | Application version |
forwardErrorsToLogs | boolean | No | Automatically forward errors to logs. Default: true |
insecureHTTP | boolean | No | Set to true for HTTP. Default: false |
apiVersion | string | No | API version. Default: v1 |
Privacy Levels
allow: Record all content including user inputmask-user-input: Mask form inputs but show other content (recommended)mask: Mask all user input and text content
User Context
openobserveRum.setUser({
  id: "user-123",
  name: "John Doe",
  email: "john.doe@example.com",
  plan: "premium",
  signup_date: "2024-01-15"
});
To clear:
openobserveRum.clearUser();Session Replay
// Automatic
openobserveRum.startSessionReplayRecording();

// Conditional
if (userEncounteredError) {
  openobserveRum.startSessionReplayRecording({ force: true });
}

// Stop
openobserveRum.stopSessionReplayRecording();
Framework-Specific Integration
Vue.js
import { createApp } from 'vue'
import App from './App.vue'
import { openobserveRum } from '@openobserve/browser-rum'
import { openobserveLogs } from '@openobserve/browser-logs'

openobserveRum.init({ /* ... configuration */ });
openobserveLogs.init({ /* ... configuration */ });

const app = createApp(App)
app.mount('#app')
React
import React from 'react';
import ReactDOM from 'react-dom';
import App from './App';
import { openobserveRum } from '@openobserve/browser-rum';
import { openobserveLogs } from '@openobserve/browser-logs';

openobserveRum.init({ /* ... configuration */ });
openobserveLogs.init({ /* ... configuration */ });

ReactDOM.render(<App />, document.getElementById('root'));
Angular
import { platformBrowserDynamic } from '@angular/platform-browser-dynamic';
import { AppModule } from './app/app.module';
import { openobserveRum } from '@openobserve/browser-rum';
import { openobserveLogs } from '@openobserve/browser-logs';

openobserveRum.init({ /* ... configuration */ });
openobserveLogs.init({ /* ... configuration */ });

platformBrowserDynamic().bootstrapModule(AppModule);
React Native Setup (Beta)
Install the Packages
npm install @openobserve/mobile-react-native @openobserve/mobile-react-native-session-replayOr with yarn:
yarn add @openobserve/mobile-react-native @openobserve/mobile-react-native-session-replayiOS also needs the native pods linked after install:
npx pod-installInitialize the SDK
Build the configuration with OpenObserveProviderConfiguration and wrap your app tree in OpenObserveProvider — this single component initializes the SDK, enables RUM and Logs, and starts any automatic instrumentation you turn on:
import {
  OpenObserveProvider,
  OpenObserveProviderConfiguration,
  TrackingConsent,
} from '@openobserve/mobile-react-native';

const OPENOBSERVE_ENDPOINT = 'https://your-instance.example.com/rum/v1/default';

const config = new OpenObserveProviderConfiguration(
  'your-client-token-here', // clientToken
  'production',             // env
  TrackingConsent.GRANTED,
  {
    // The SDK appends /rum and /logs to these base URLs itself.
    rumConfiguration: {
      applicationId: 'my-react-native-app',
      customEndpoint: OPENOBSERVE_ENDPOINT,
      trackInteractions: true,
      trackResources: true,
      trackErrors: true,
    },
    logsConfiguration: {
      customEndpoint: OPENOBSERVE_ENDPOINT,
    },
  },
);
config.service = 'my-react-native-app';

export default function App() {
  return (
    <OpenObserveProvider configuration={config}>
      {/* your navigation container and app tree */}
    </OpenObserveProvider>
  );
}
Navigation Tracking (Optional)
Track screen views automatically with React Navigation:
npm install @openobserve/mobile-react-navigationimport { O2RumReactNavigationTracking } from '@openobserve/mobile-react-navigation';
<NavigationContainer
ref={navigationRef}
onReady={() => {
O2RumReactNavigationTracking.startTrackingViews(navigationRef.current);
}}
>
{/* your screens */}
</NavigationContainer>Without navigation tracking, you can record views manually with O2Rum.startView() / O2Rum.stopView().
Session Replay
import { SessionReplay } from '@openobserve/mobile-react-native-session-replay';

SessionReplay.enable({
  replaySampleRate: 20, // replay is heavier — sample lower than sessions
  startRecordingImmediately: true,
  // Session Replay does NOT inherit rumConfiguration.customEndpoint — give
  // it its own base URL, same shape as the one above. As of SDK 0.1.2 the
  // bridge appends /replay itself; appending it here too double-appends
  // the path and every upload gets rejected with 401.
  customEndpoint: OPENOBSERVE_ENDPOINT,
}).catch(() => {});
!!! warning "Session Replay's customEndpoint changed in SDK 0.1.2"
Before `0.1.2`, this needed the full `.../replay` URL spelled out. As of `0.1.2` the bridge appends `/replay` automatically, matching RUM and Logs above. If you're on an older version, append `/replay` to `OPENOBSERVE_ENDPOINT` yourself; on `0.1.2`+, don't — a manually appended `/replay` now double-appends the path and gets rejected with `401`, which looks exactly like a bad token.Android Setup (Beta)
Install the SDK
Add the OpenObserve dependencies to your Gradle build file.
Kotlin DSL (build.gradle.kts):
dependencies {
  implementation("ai.openobserve:o2-sdk-android-rum:0.1.0")
  implementation("ai.openobserve:o2-sdk-android-logs:0.1.0")
  // Optional — screen recording.
  implementation("ai.openobserve:o2-sdk-android-session-replay:0.1.0")
}
Groovy (build.gradle):
dependencies {
  implementation "ai.openobserve:o2-sdk-android-rum:0.1.0"
  implementation "ai.openobserve:o2-sdk-android-logs:0.1.0"
  // Optional — screen recording.
  implementation "ai.openobserve:o2-sdk-android-session-replay:0.1.0"
}
The session-replay dependency is optional — drop that line if you do not need screen recording.
Initialize the SDK
Initialize in your Application subclass as early as possible:
import android.app.Application
import com.openobserve.android.OpenObserve
import com.openobserve.android.core.configuration.Configuration
import com.openobserve.android.log.Logs
import com.openobserve.android.log.LogsConfiguration
import com.openobserve.android.privacy.TrackingConsent
import com.openobserve.android.rum.Rum
import com.openobserve.android.rum.RumConfiguration
import com.openobserve.android.rum.tracking.ActivityViewTrackingStrategy

class SampleApplication : Application() {
    override fun onCreate() {
        super.onCreate()

        val configuration = Configuration.Builder(
            clientToken = "your-client-token-here",
            env = "production",
            service = "my-android-app",
        )
            .build()

        OpenObserve.initialize(this, configuration, TrackingConsent.GRANTED)

        // The native SDK does NOT append a path to a custom endpoint — give each
        // feature its own FULL intake URL.
        Rum.enable(
            RumConfiguration.Builder(applicationId = "my-android-app")
                .useCustomEndpoint("https://your-instance.example.com/rum/v1/default/rum")
                .trackUserInteractions()
                .trackLongTasks()
                .useViewTrackingStrategy(ActivityViewTrackingStrategy(trackExtras = true))
                .build(),
        )

        Logs.enable(
            LogsConfiguration.Builder()
                .useCustomEndpoint("https://your-instance.example.com/rum/v1/default/logs")
                .build(),
        )
    }
}Important: The native Android SDK appends nothing to a custom endpoint — it posts to exactly the URL you pass. Each feature (RUM, Logs, Session Replay) needs its own full intake URL ending in /rum, /logs, or /replay.
If your ingestion endpoint uses plain HTTP (http://), allow cleartext traffic:
// Allow cleartext for the SDK
Configuration.Builder(...)
    .let { com.openobserve.android._InternalProxy.allowClearTextHttp(it) }
    .build()
Also set android:usesCleartextTraffic="true" in your manifest. Prefer HTTPS outside local development.
Session Replay
import com.openobserve.android.sessionreplay.SessionReplay
import com.openobserve.android.sessionreplay.SessionReplayConfiguration
import com.openobserve.android.sessionreplay.TextAndInputPrivacy
import com.openobserve.android.sessionreplay.ImagePrivacy
import com.openobserve.android.sessionreplay.TouchPrivacy

SessionReplay.enable(
    SessionReplayConfiguration.Builder(sampleRate = 100f)
        .useCustomEndpoint("https://your-instance.example.com/rum/v1/default/replay")
        .setTextAndInputPrivacy(TextAndInputPrivacy.MASK_SENSITIVE_INPUTS)
        .setImagePrivacy(ImagePrivacy.MASK_NONE)
        .setTouchPrivacy(TouchPrivacy.SHOW)
        .build(),
)
Android Emulator Networking
localhost inside an emulator refers to the emulator itself. Use 10.0.2.2 to reach your host machine:
https://10.0.2.2:5080/rum/v1/default/rumOn a physical device use your machine's LAN IP.
iOS Setup (Beta)
Install the SDK
Swift Package Manager (Package.swift):
dependencies: [
    .package(url: "https://github.com/openobserve/openobserve-sdk-ios.git", from: "0.1.0"),
],
targets: [
    .target(
        name: "MyApp",
        dependencies: [
            .product(name: "OpenObserveCore", package: "openobserve-sdk-ios"),
            .product(name: "OpenObserveRUM", package: "openobserve-sdk-ios"),
            .product(name: "OpenObserveLogs", package: "openobserve-sdk-ios"),
            // Optional — screen recording.
            .product(name: "OpenObserveSessionReplay", package: "openobserve-sdk-ios"),
        ],
    ),
]
Or add the package in Xcode: File → Add Package Dependencies... and paste https://github.com/openobserve/openobserve-sdk-ios.git.
CocoaPods (Podfile):
pod 'OpenObserveCore', '0.1.0'
pod 'OpenObserveRUM', '0.1.0'
pod 'OpenObserveLogs', '0.1.0'
# Optional — screen recording.
pod 'OpenObserveSessionReplay', '0.1.0'
Then run pod install.
Initialize the SDK
import OpenObserveCore
import OpenObserveRUM
import OpenObserveLogs
import UIKit

@main
class AppDelegate: UIResponder, UIApplicationDelegate {
    func application(
        _ application: UIApplication,
        didFinishLaunchingWithOptions launchOptions: [UIApplication.LaunchOptionsKey: Any]? = nil
    ) -> Bool {
        let configuration = OpenObserve.Configuration(
            clientToken: "your-client-token-here",
            env: "production",
            service: "my-ios-app"
        )
        OpenObserve.initialize(with: configuration, trackingConsent: .granted)

        // The native SDK does NOT append a path to a custom endpoint — give each
        // feature its own FULL intake URL.
        RUM.enable(
            with: RUM.Configuration(
                applicationID: "my-ios-app",
                sessionSampleRate: 100,
                uiKitViewsPredicate: DefaultUIKitRUMViewsPredicate(),
                customEndpoint: URL(string: "https://your-instance.example.com/rum/v1/default/rum")
            )
        )

        Logs.enable(
            with: Logs.Configuration(
                customEndpoint: URL(string: "https://your-instance.example.com/rum/v1/default/logs")
            )
        )

        return true
    }
}Important: The native iOS SDK appends nothing to a customEndpoint — it posts to exactly the URL you pass. Each feature (RUM, Logs, Session Replay) needs its own full intake URL ending in /rum, /logs, or /replay.
If your ingestion endpoint uses plain HTTP, iOS blocks cleartext traffic via App Transport Security (ATS). There is no SDK flag — add an NSAppTransportSecurity exception for your host in Info.plist:
<key>NSAppTransportSecurity</key>
<dict>
    <key>NSExceptionDomains</key>
    <dict>
        <key>your-instance.example.com</key>
        <dict>
            <key>NSExceptionAllowsInsecureHTTPLoads</key>
            <true/>
        </dict>
    </dict>
</dict>
Prefer HTTPS outside local development.
Session Replay
import OpenObserveSessionReplay

SessionReplay.enable(
    with: SessionReplay.Configuration(
        replaySampleRate: 100,
        textAndInputPrivacyLevel: .maskSensitiveInputs,
        imagePrivacyLevel: .maskNone,
        touchPrivacyLevel: .show,
        customEndpoint: URL(string: "https://your-instance.example.com/rum/v1/default/replay")
    )
)
Verify Installation
After deploying your application with RUM enabled:
- Launch your application and perform interactions
- Log in to OpenObserve and navigate to the RUM section
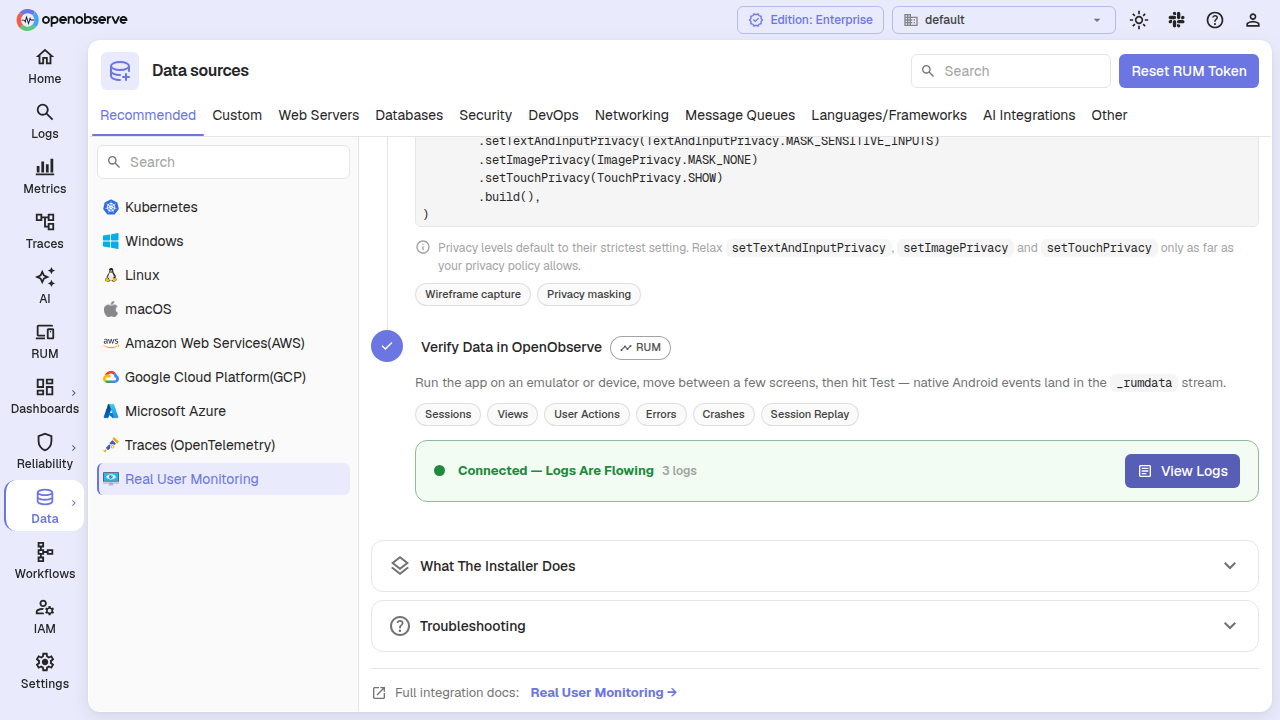
- In the in-app setup guide, the Verify step auto-detects incoming data — look for the green checkmark
- Explore your data across:
- Performance tab — adaptive dashboards showing metrics your stream actually emits. Dashboards automatically remove panels whose columns do not exist in the stream schema (e.g. Web Vitals panels hide for mobile-only apps)
- Sessions tab — user sessions from all platforms, filterable by
source = 'browser',source = 'android',source = 'ios' - Error Tracking tab — errors and crashes from any platform
- Session Replay — replay recordings of user sessions
Troubleshooting
No Data Appearing
- Check console / logcat / Xcode console for initialization errors
- Verify the RUM client token: ensure it matches the token on the Ingestion → RUM page
- Check network requests:
- Browser: DevTools → Network tab
- Android: inspect with
adb logcator a network profiler - iOS: use Xcode's Network inspector or tools like Proxyman
Browser-Specific
- CORS: ensure your OpenObserve instance allows requests from your application domain
- Privacy settings:
defaultPrivacyLevelaffects what is recorded
Mobile: Endpoint URLs
The single most common reason one signal arrives while another does not is an incorrect endpoint URL, and native iOS/Android and React Native behave differently here:
-
Native iOS and Android —
useCustomEndpoint/customEndpointis used verbatim; the SDK appends nothing. Pass the complete per-feature URL:Feature URL suffix RUM /rum/v1/{org}/rumLogs /rum/v1/{org}/logsSession Replay /rum/v1/{org}/replayFor example:
https://your-instance.example.com/rum/v1/default/rum -
React Native — the bridge appends the feature suffix itself. Pass the same bare base URL (
https://your-instance.example.com/rum/v1/default) torumConfiguration.customEndpoint,logsConfiguration.customEndpoint, and Session Replay'scustomEndpoint(SDK0.1.2+ for Session Replay — see the React Native Session Replay section above). Appending a suffix yourself double-appends it and the request is rejected with401.
Mobile: No Data from Emulator / Device
- Android emulator: use
10.0.2.2instead oflocalhostor127.0.0.1 - Physical devices: use your machine's LAN IP on the same network
Mobile: Plain HTTP (http://) Not Working
- Android: allow cleartext with
_InternalProxy.allowClearTextHttp(builder)and setandroid:usesCleartextTraffic="true"in the manifest - iOS: add an
NSAppTransportSecurityexception for your host inInfo.plist
Session Replay Not Recording
- All platforms: ensure the session replay feature is enabled separately from RUM — it does not inherit RUM's endpoint
- Browser: call
startSessionReplayRecording()afteropenobserveRum.init() - Native iOS / Android: pass the full
/replayendpoint toSessionReplay.enable(...), not the RUM endpoint - React Native: pass the bare base URL (no
/replaysuffix) — the bridge appends it itself as of SDK0.1.2. On older versions, append/replayyourself.
Requests Return 401 or 403
Two common causes:
- The
clientTokenis your org's RUM token, not the ingestion passcode. If it was rotated, regenerate it from the Ingestion → RUM page and rebuild your app. - React Native Session Replay specifically: appending
/replaytocustomEndpointyourself on SDK0.1.2+ double-appends the path (the bridge already adds it), which is also rejected with401. Pass the bare base URL instead — see "Mobile: Endpoint URLs" above.
Views / Screens All Named the Same
View tracking may not be wired up:
- Browser: views are captured automatically from page navigation
- React Native: pass your navigation ref to
O2RumReactNavigationTracking.startTrackingViews(), or callO2Rum.startView()/O2Rum.stopView()manually - Android: pass
ActivityViewTrackingStrategy(trackExtras = true)for Activities, orNavigationViewTrackingStrategy(...)for Jetpack Compose Navigation - iOS: pass
uiKitViewsPredicate: DefaultUIKitRUMViewsPredicate()for UIKit, or aswiftUIViewsPredicatefor SwiftUI
Package Resolution Fails (iOS)
Confirm the SPM URL https://github.com/openobserve/openobserve-sdk-ios.git and that the version 0.1.0 exists, then in Xcode go to File → Packages → Reset Package Caches and resolve again.
Performance Impact
RUM is designed to have minimal impact:
- Asynchronous: data collection runs off the main thread
- Batching: events are batched before sending
- Lightweight: SDKs are small and tree-shaken where possible
- Sampling: configure sampling rates to control data volume
Advanced Configuration
Custom Sampling
Control which sessions are tracked:
// Browser
openobserveRum.init({
  sessionSampleRate: 100,          // Track 100% of sessions
  sessionReplaySampleRate: 50,     // Record 50% of sessions
});
On native platforms, set the sample rate during RUM.Configuration or SessionReplay.Configuration construction.
Manual Error Tracking
try {
  // Your code
} catch (error) {
  openobserveLogs.logger.error('Custom error message', {
    error: error,
    context: 'additional context'
  });
}
On native platforms, use Logs.logger.error(...) or your platform's equivalent.
Custom Actions
openobserveRum.addAction('button_clicked', {
  button_name: 'subscribe',
  page: 'homepage'
});
Cross-Platform Data Filtering
All platforms write to the _rumdata stream. Filter by source to isolate a specific platform:
SELECT * FROM "_rumdata" WHERE source = 'android'
SELECT * FROM "_rumdata" WHERE source = 'ios'
SELECT * FROM "_rumdata" WHERE source = 'browser'
The performance dashboards automatically adapt to your stream's schema — panels whose columns are absent are dropped, and platform-tagged panels flow to the platforms that have data.
Next Steps
- Performance Monitoring - Learn about performance metrics and adaptive dashboards
- Session Tracking - Understand session data across platforms
- Error Tracking - Track and debug errors and crashes
- Session Replay - Use session replay on web and mobile
- Metrics Reference - Complete metrics documentation
Last updated on
RUM Overview
OpenObserve RUM captures real user sessions in production, recording actual interactions, performance metrics, and errors across every device and browser.
Performance Monitoring
RUM performance monitoring tracks Core Web Vitals like LCP, FID, and CLS plus page load, API response times, and slow resources in a real-time dashboard.